How to Cloud - Spin up a Well-Architected RDS Instance
August 5, 2022
Launching a Mysql instance on AWS is easy. The AWS console offers a step-by-step roadmap to create an instance. Additionally, articles like this and this show you how. That's is all well and good but the database you’ll end up with is not ready for prime-time. A production database needs backups, failover mechanisms and a wee bit extra security.
The Well-Architected Framework
AWS organizes and publishes their best thinking and ideas to create a modern cloud-system in the Well Architected Framework. I imagine this is how the engineers/architects at AWS and other big players think when designing a cloud-native workload.
There’s a lot to digest in the framework, so take the time to study their documents, white-papers and videos. I whittled down the framework into a simple checklist based on my understanding of the guidelines. It’s a work-in-progress, but I hope it spurs conversations on how you want to build up your systems .
Here’s a preview:
In the spirit of the framework, we’ll work towards these features for our database instance:
- Our db is configured entirely via code i.e. Infrastructure as code i.e Terraform. CloudFormation works too.
- The db scales automatically based on traffic and capacity.
- Our database fails over to a standby instance if the main instance fails.
- DB access passwords are randomly generated via AWS Secrets Manager.
- DB data is encrypted at rest.
- DB logs are sent to AWS CloudWatch
- We have an idea how much this instance will cost us.
- We are notified when the db error rate crosses a certain threshold.
- Our data is backed up often.
- DB Queries are monitored for performance.
- Documentation for our code is auto-generated.
Here's an architecture diagram of what we'll build.
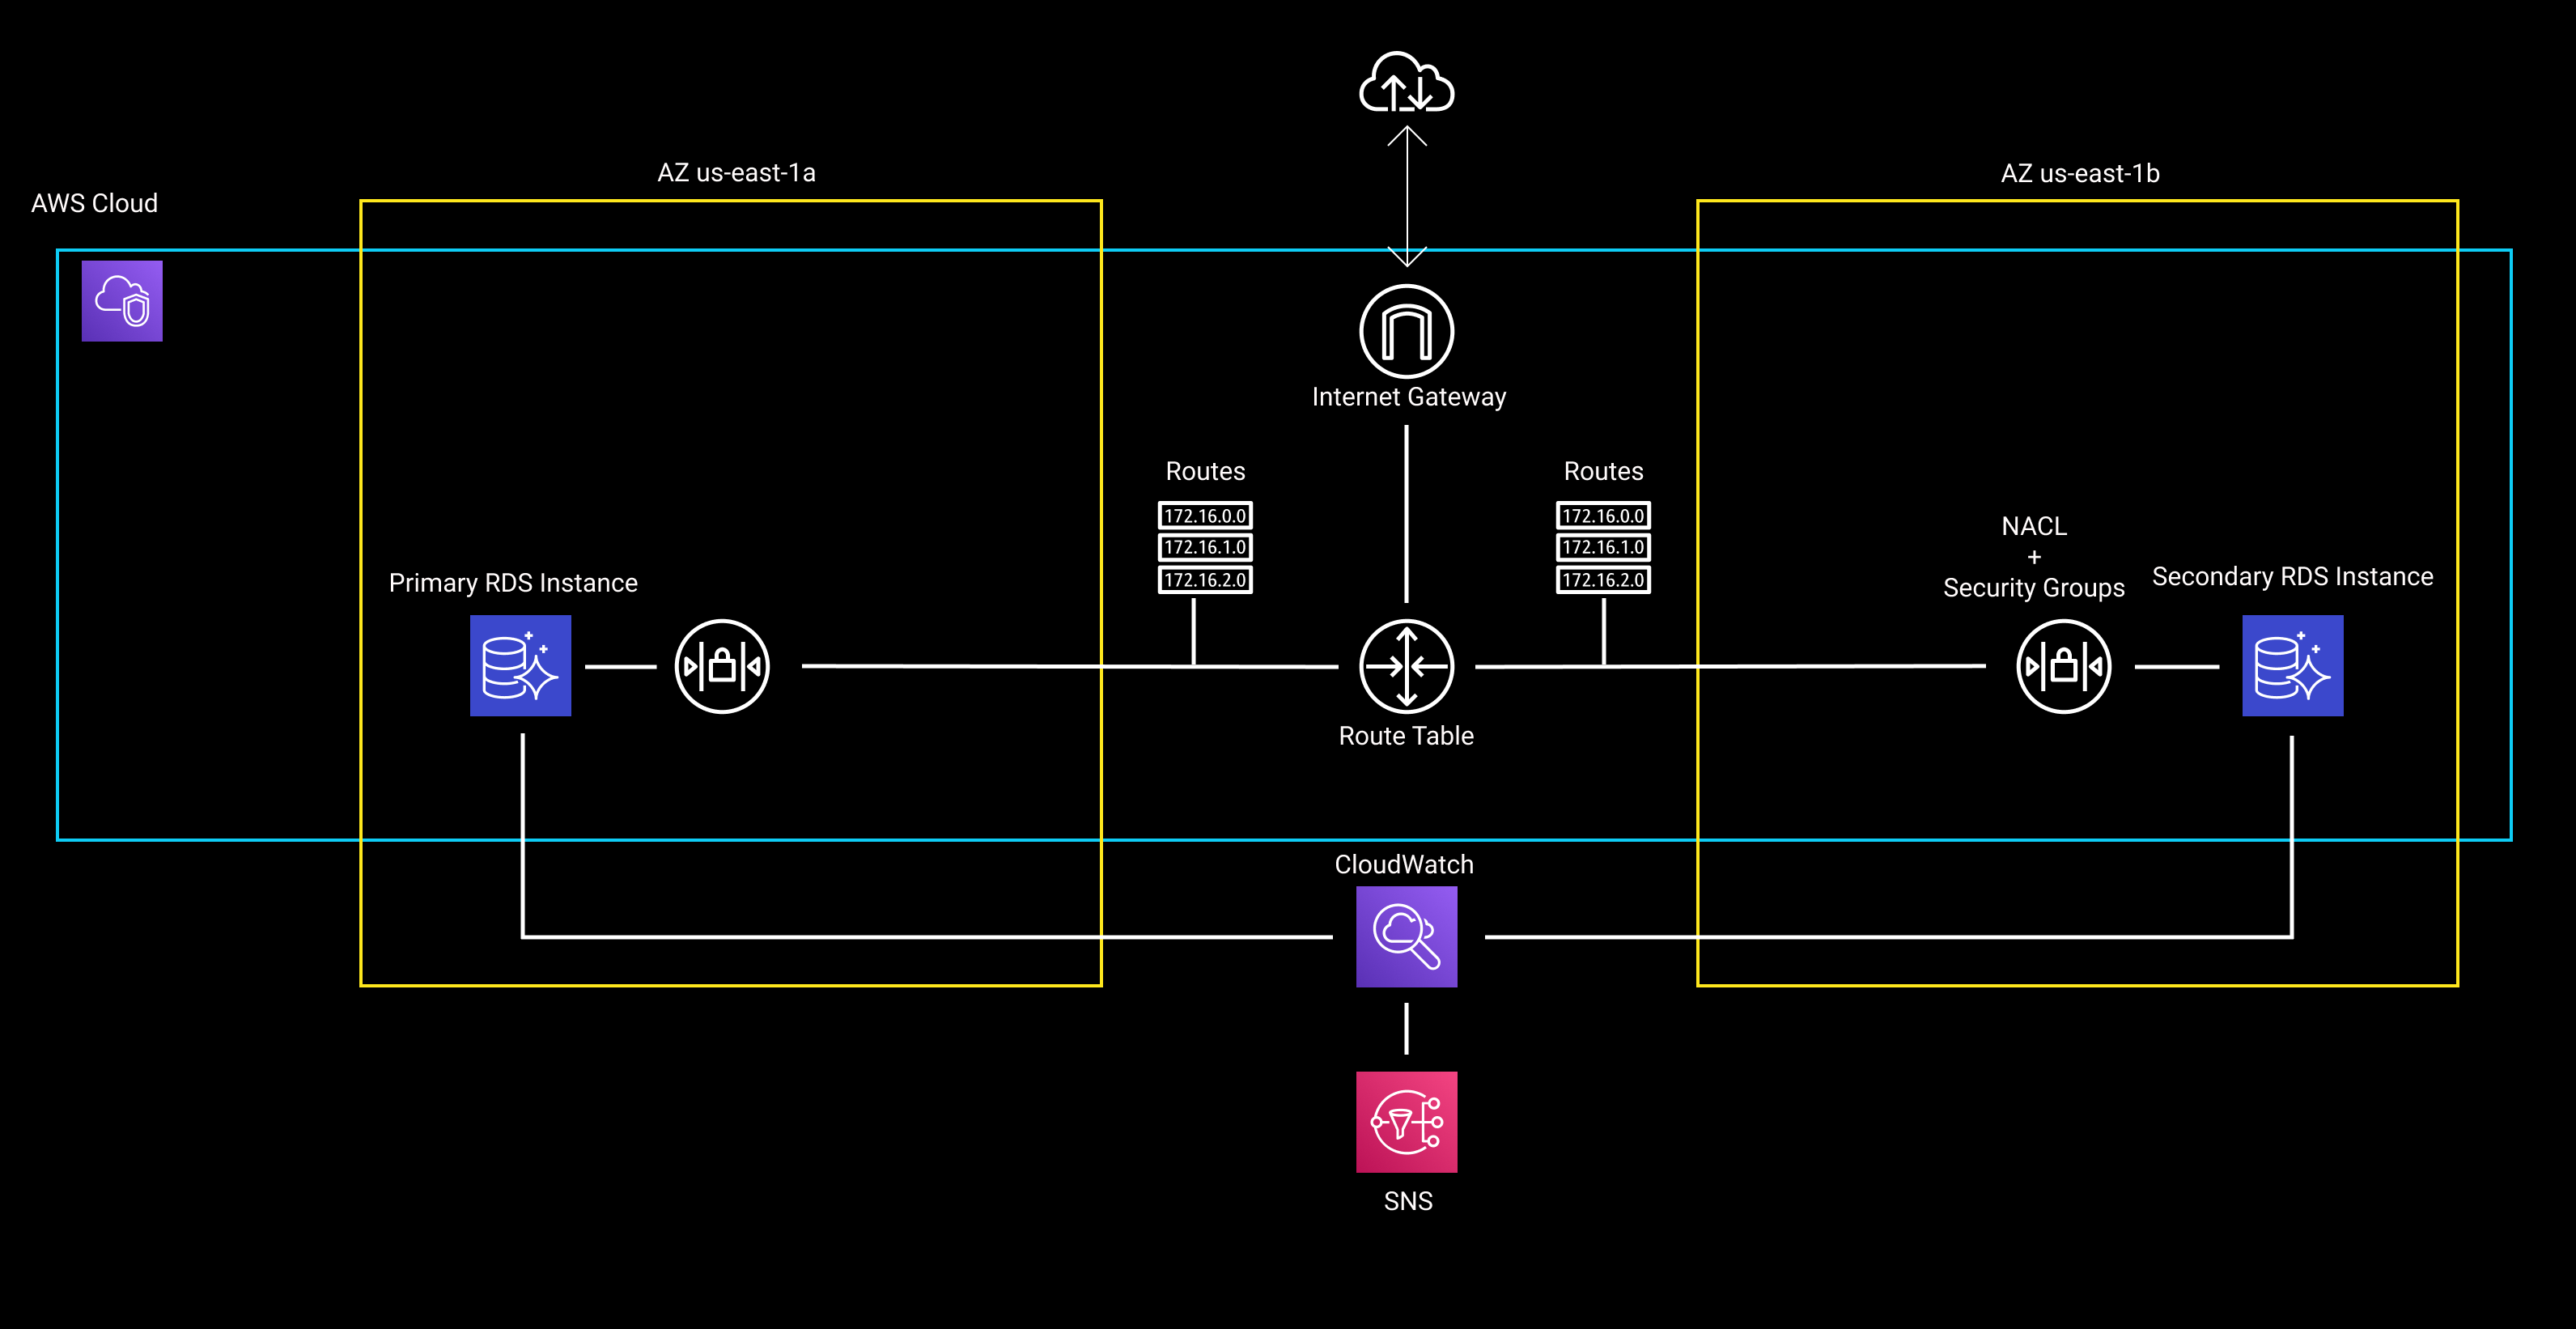 Image 1: Diagram of our RDS setup
A cloud database that checks most of these boxes will do well in a live application.
Now for some caveats. Firstly, a single database instance is by no means an “Architecture”. An architecture implies many pieces of infrastructure working together. That is fair. The goal though, is to build our cloud chops in smaller chunks; and if we can think carefully about a single DB instance, we can apply that same level of care when rolling out a more complex system.
Secondly, the framework recommends choosing managed services, like AWS Aurora over services where you, the developer, is responsible for the care and feeding of the servers. I’ll follow up this article with one on Aurora, but if we can confidently knock out a Mysql DB with the extra bells and whistles, we’re on a good path to managed databases.
And finally, before we select a DB type (Mysql, DocumentDB, DynamoDb), we must first understand the data we want to store. Is it tabular, or key-value pairs or a social graph? And is it confidential information that could be misused, or public data that doesn’t need to be locked down to a great degree. Think along these lines before you decide on DB types, sizes and security. For this exercise we’ll assume that we’re working with tabular data, that is proprietary and private, and should be no more than 20 GB over a year.
Code
The entire code is available at this repo
Before we start with the code, we should know how much this database will cost us. Forecasting the cost of your workload is a key principle of the WA Framework. I opened up the Pricing Calculator and looked for the cost of an RDS Mysql Instance, with a Multi-AZ standby, ~30Gb of storage and some extra storage for backups.
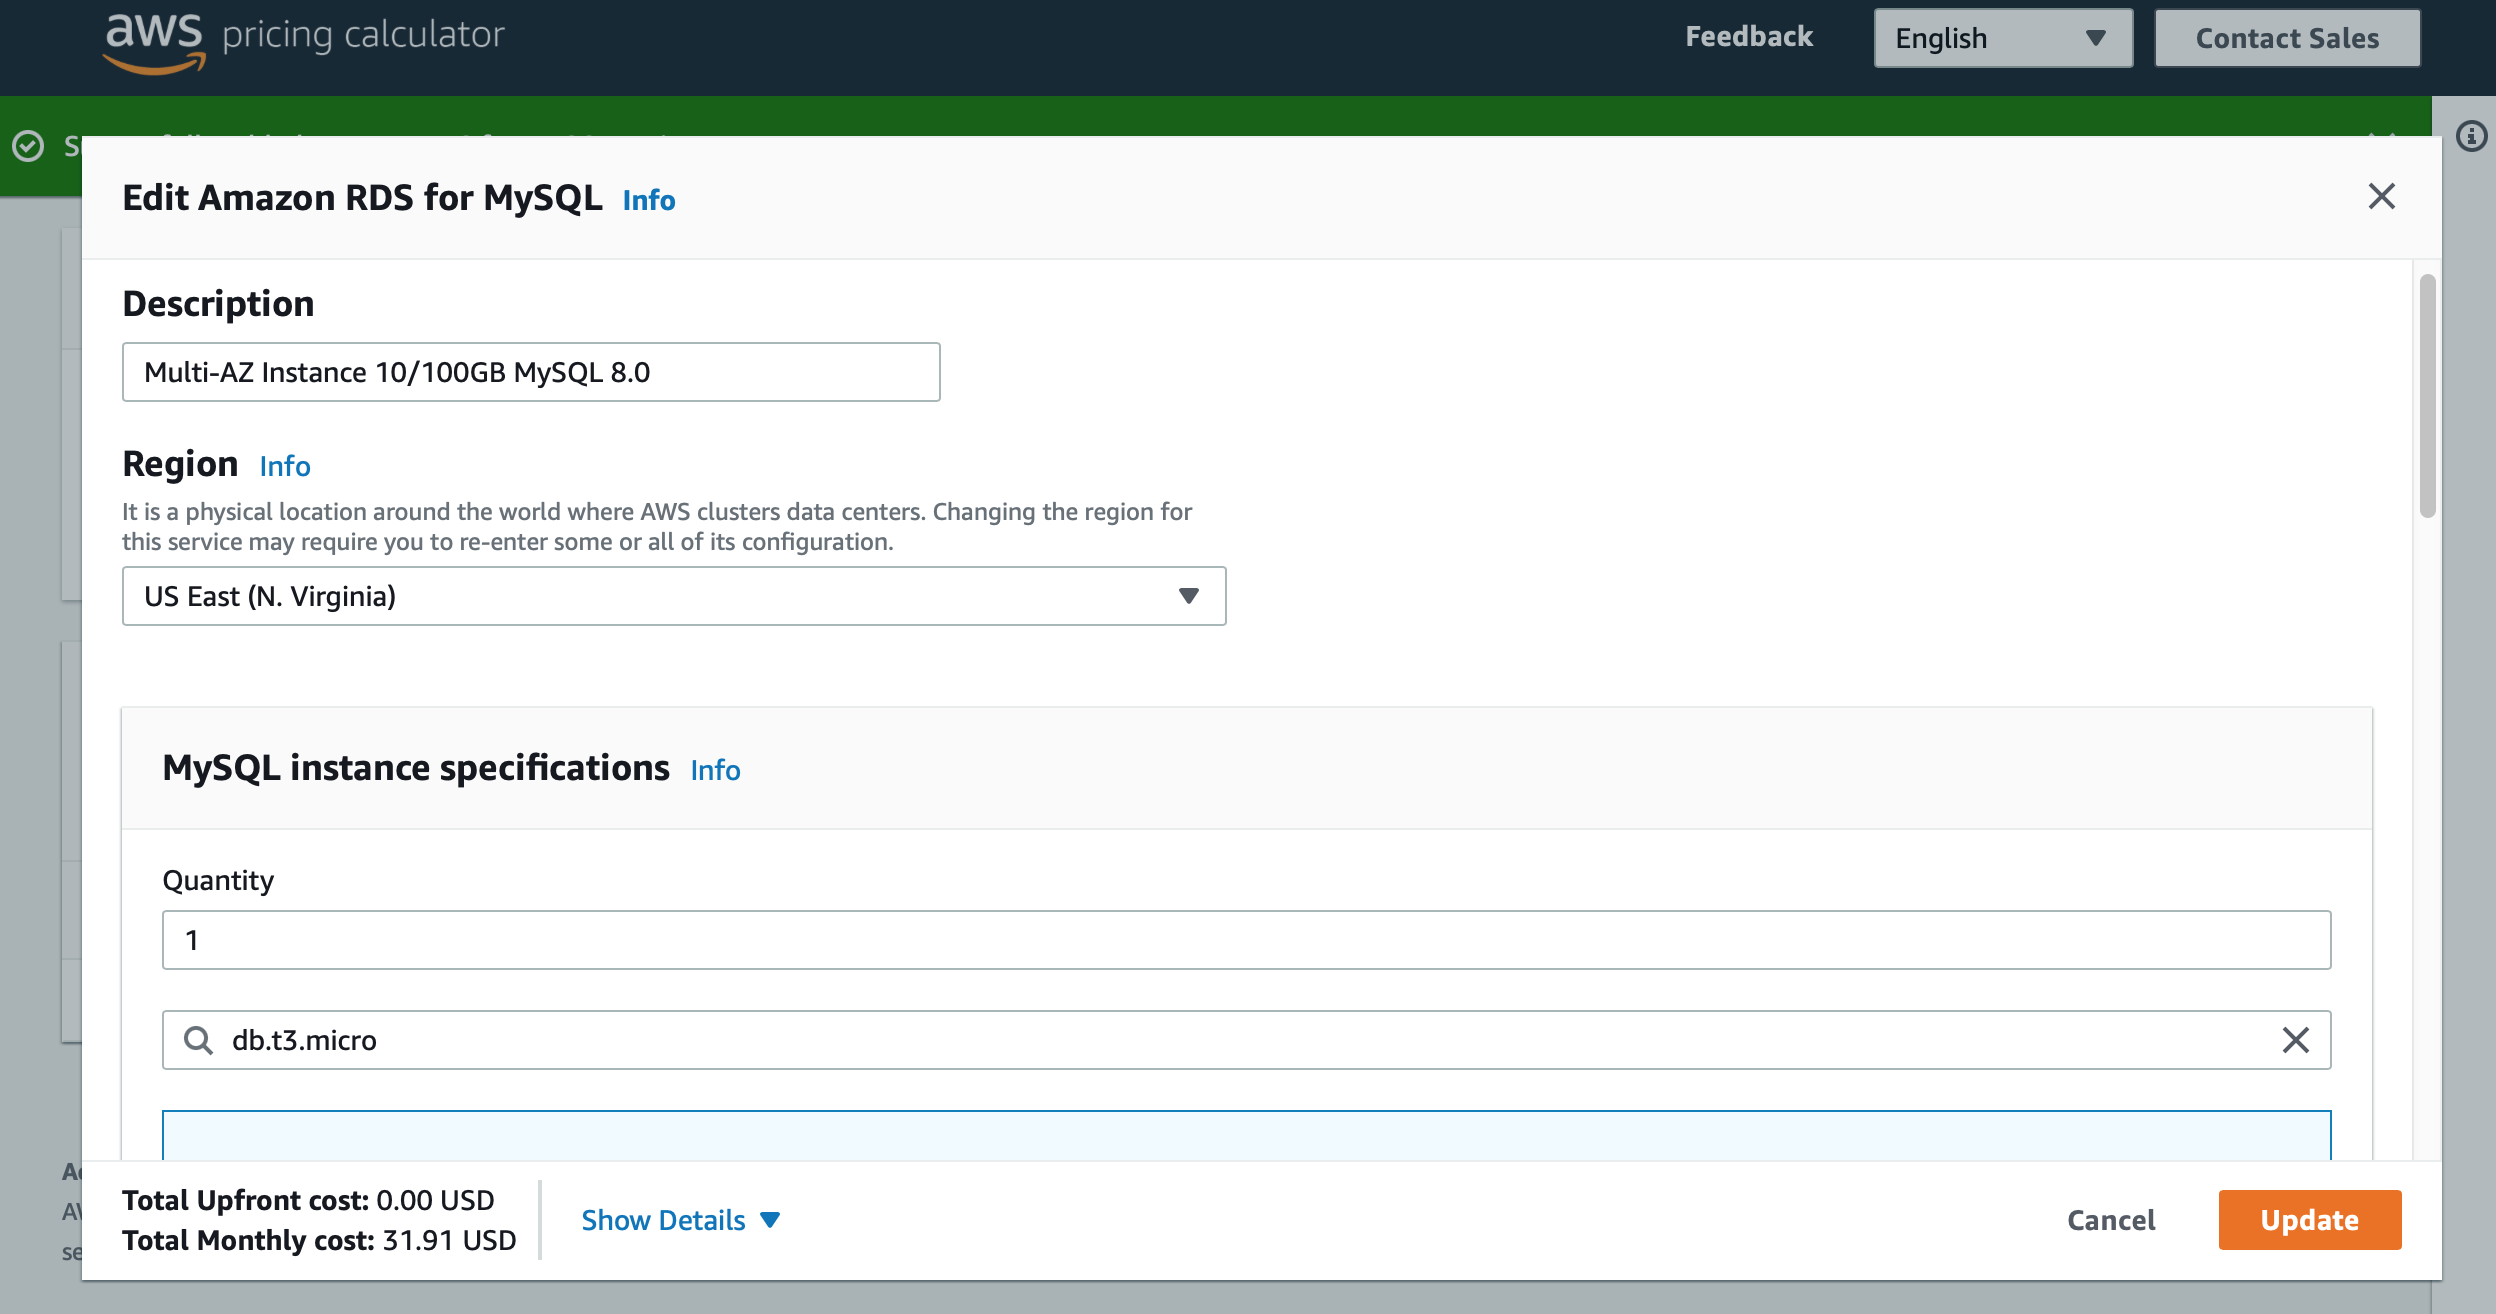 Image 2: Pricing Calculator on AWS
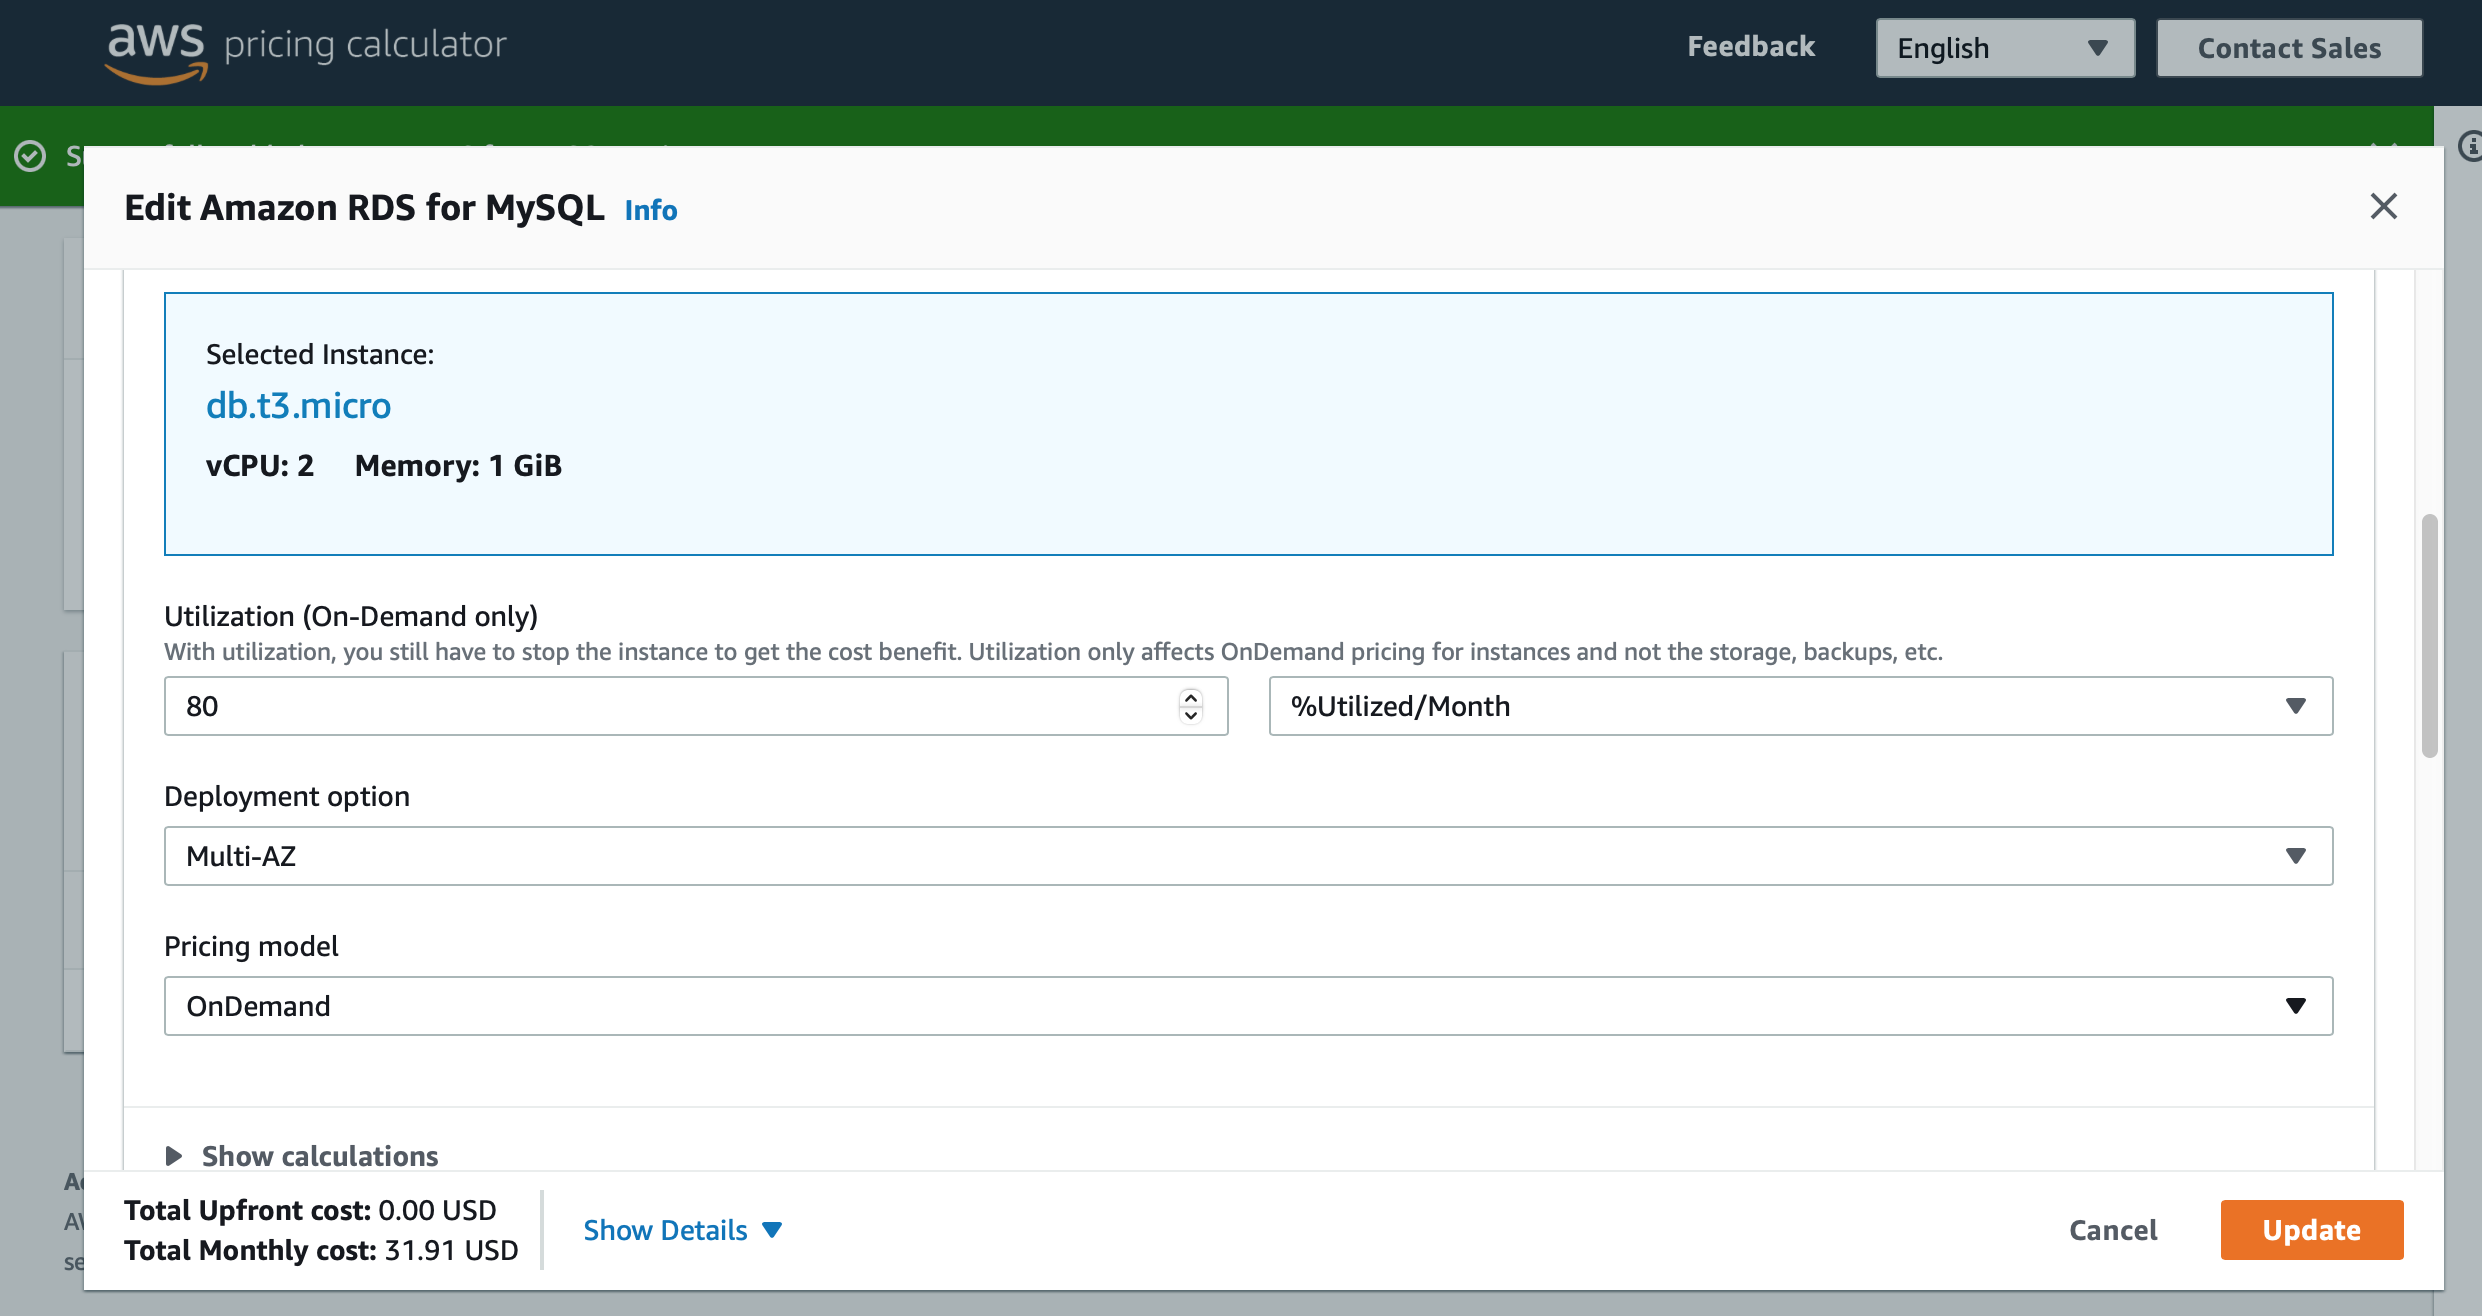 Image 3: Pricing Calculator on AWS
The final estimate came to $31.00 a month or an annual spend of $382.00. The actual cost will differ, but you must know what you’re getting for that spend.
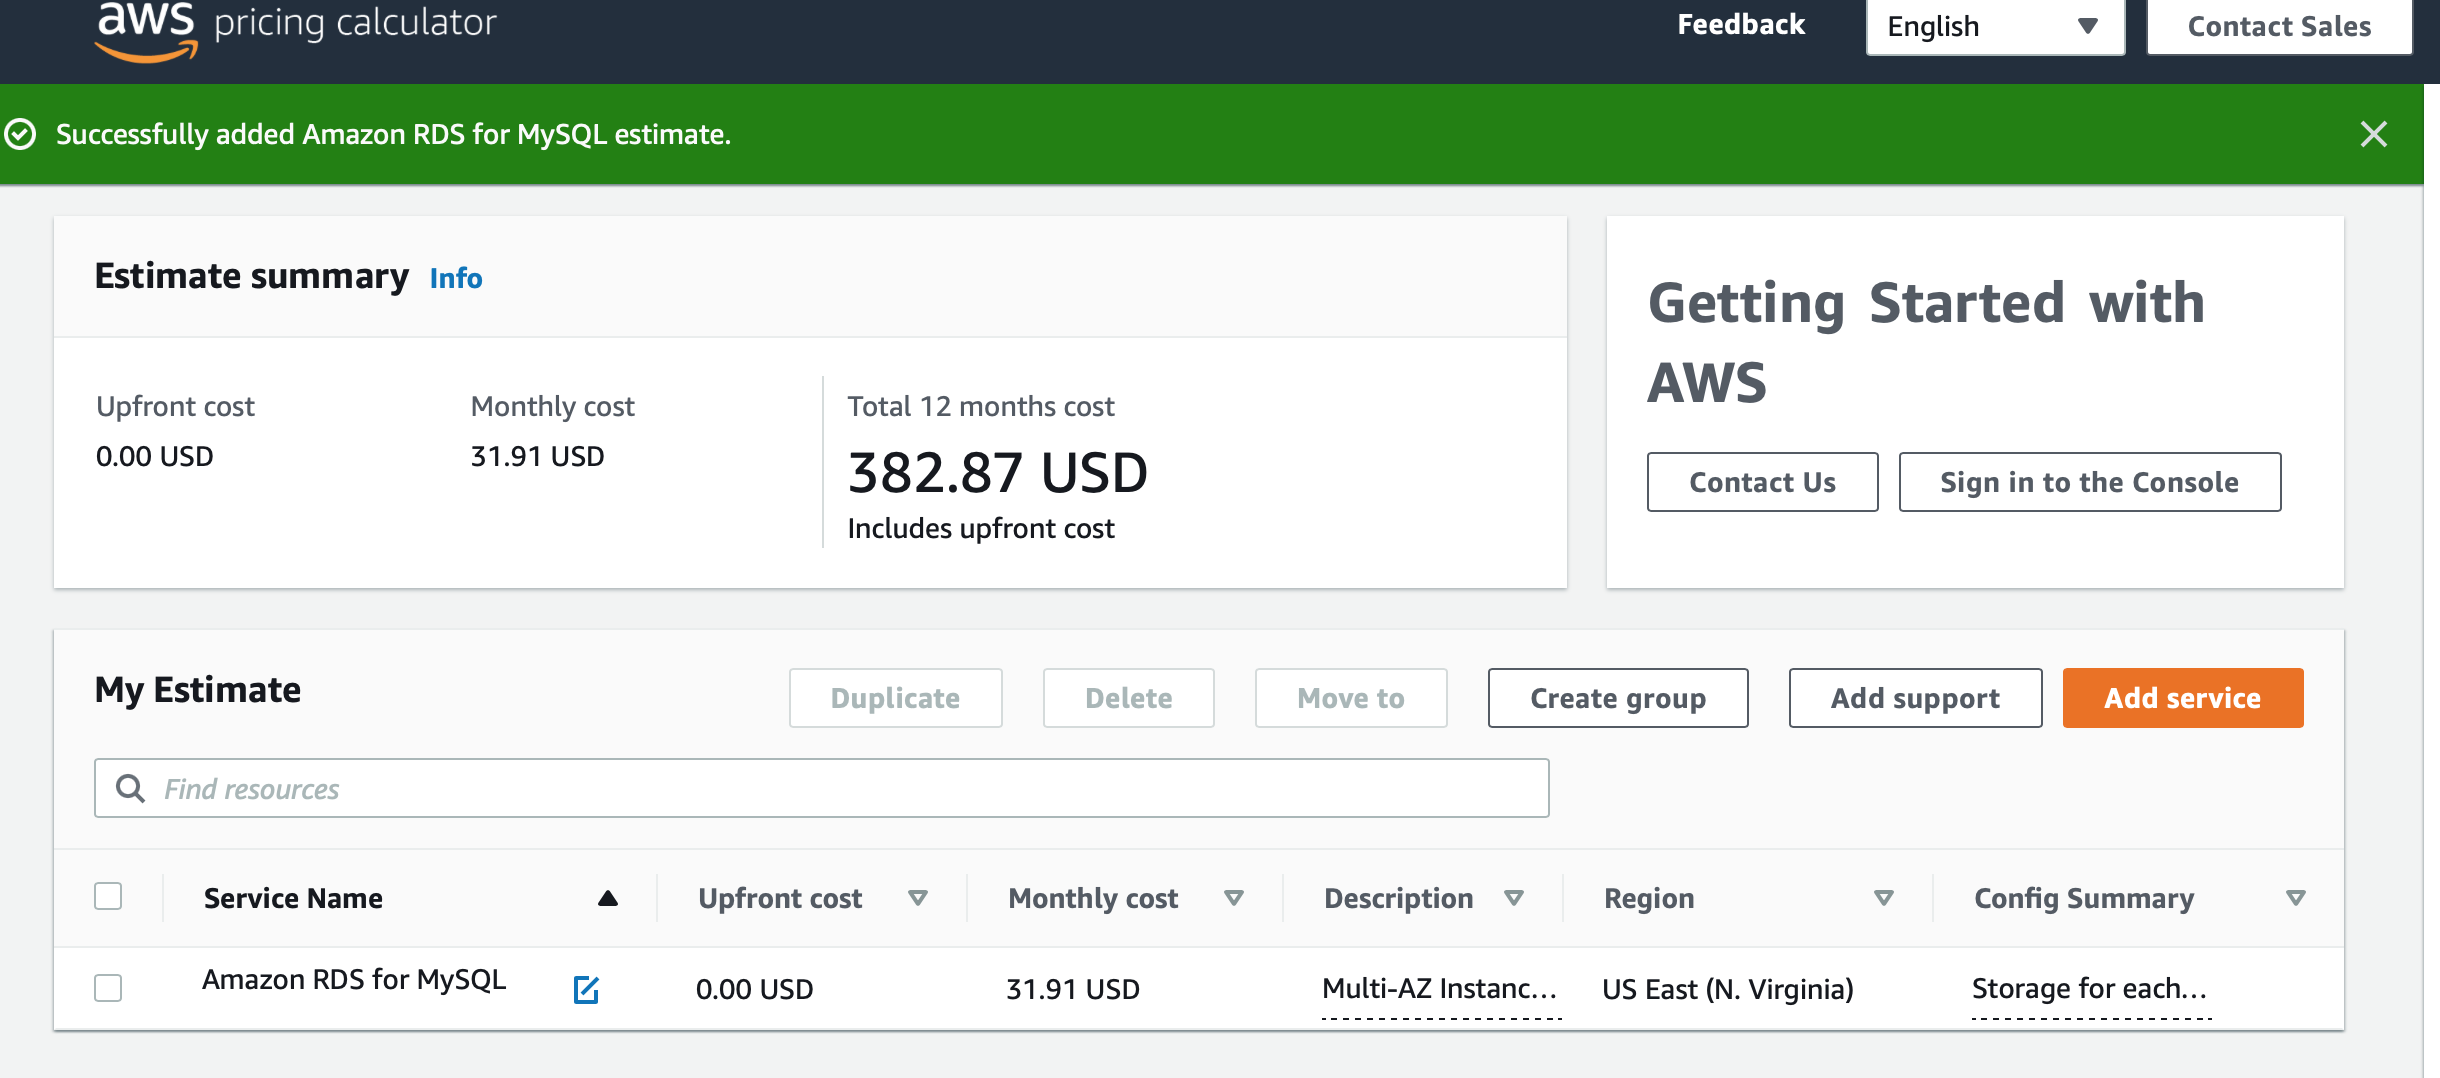 Image 4: Pricing Calculator on AWS
With that out of the way, let’s start with the barebones Terraform code to spin up an RDS DB.
resource "aws_db_instance" "default" {
  allocated_storage    = 10
  engine               = "mysql"
  engine_version       = "8.0"
  instance_class       = "db.t3.micro"
  name                 = "mydb"
  username             = "admin"
  password             = "password1"
  skip_final_snapshot  = true
}

output "my_db_endpoint" {
  value = aws_db_instance.default.endpoint
}
This config block creates a MySql instance with 10GB of storage on a db.t3.micro class of server. The version of Mysql is 8.0 and the credentials are hardcoded in the Terraform block. Run this code with terraform apply and you'll end up with a new database.
Open a local terminal and connect to your mysql instance via the endpoint that was printed from your terraform like so …
mysql -u admin -p -h <mysql endpoint URL>
… and voila, you’re in your Database.
We’ll start from here and build up our wishlist of features.
Instances in multiple availability zones
Multi-AZ instances provision a standby instance in a different Availability Zone. If our main instance fails AWS will automatically failover to the standby. Check out the reference links at the end of the article for more details.
A multi-AZ database requires a Virtual Private Cloud (VPC) with at least 2 subnets in different availability zones. I wrote a separate article on spinning up a VPC. The sample code linked on this page has the VPC section as well.
Once the VPC is set up, create a subnet group and point to this group in your database code block.
resource "aws_db_subnet_group" "spgl_subnet_group" {
  name       = "main"
  subnet_ids = [aws_subnet.subnet_public_first.id, aws_subnet.subnet_public_second.id]

  tags = {
    Name        = "subnet-group-${var.project_name}"
    environment = var.tag_environment
  }
}

resource "aws_db_instance" "spgl_mysql" {
 ...
    db_subnet_group_name   = aws_db_subnet_group.spgl_subnet_group.name
  vpc_security_group_ids = [aws_security_group.sg_public.id]
...
}
Autoscaling
Automatically scale your storage when the instance reaches the limit of its capacity. RDS autoscales your instance when these conditions are met:
- Free available space is less than 10 percent of the allocated storage.
- The low-storage condition lasts at least five minutes.
- At least six hours have passed since the last storage modification, or storage optimization has completed on the instance, whichever is longer.
Reference here
Add the max_allocated_storage property so that your database scales to an upper limit when needed.
resource "aws_db_instance" "spgl_mysql" {
 ...
  allocated_storage     = 10
  max_allocated_storage = 100
...
}
Backups
Choose how long you want to keep your DB backups alive (between 0 and 35 days) with the backup_retention_period property. I chose 21 days.
Better security with Secrets Manager
Hardcoding the username and password in the aws_db_instance resource block is not recommended since this code is checked into git. A better option is to create a new secret in Secrets Manager with a randomly generated string, then use the secret as your password. You may also use this method to generate a secure username.
You can enhance the security of your database by rotating the secret every few days. If you have an an app that connects to the db, you will need to first read the latest password from the secret before attempting a connection with the database.
# Randomly generated passphrase
data "aws_secretsmanager_random_password" "spgl_db_pwd" {
  password_length     = 18
  exclude_punctuation = true
}

resource "aws_secretsmanager_secret" "password" {
  name = "spgl_db_pwd_secret"
}

resource "aws_secretsmanager_secret_version" "mysql_password_secret_version" {
  secret_id     = aws_secretsmanager_secret.password.id
  secret_string = data.aws_secretsmanager_random_password.spgl_db_pwd.random_password
}

resource "aws_db_instance" "spgl_mysql" {
 ...
    username       = "admin"
  password       = data.aws_secretsmanager_secret_version.mysql_password_secret_version.secret_string
...
}
Encrypt data at rest
To encrypt your data and backups, you can create a new KMS key or use the one that AWS assigns to each account. The code here is pretty straightforward. On the AWS console, navigate to the KMS section and look for the AWS Managed keys to find your key.
data "aws_kms_key" "rds_alias" {
  key_id = "alias/aws/rds"
}

resource "aws_db_instance" "spgl_mysql" {
 ...
  kms_key_id        = data.aws_kms_key.rds_alias.arn
  storage_encrypted = true
...
}
All logs go to CloudWatch
Remember to stash your DB logs to CloudWatch. I send all the DB generated logs, but you can be picky. At the very least, save your error and slowquery logs for later.
resource "aws_db_instance" "spgl_mysql" {
 ...
  enabled_cloudwatch_logs_exports = ["audit", "general", "error", "slowquery"]
...
}
Automate monitoring for errors
We want the logs to be monitored for errors and to be notified when the error count grows past a safe threshold. A CloudWatch Alarm, in combination with an SNS topic, will track the rate of incoming logs in the DB’s error logs and publish the alarm when that happens.
This code creates an SNS topic and 2 subscribers (email and SMS). The subscribers take hardcoded values for email and text. When you run this code, the email in the first subscriber receives a confirmation mail. You will need to confirm your email before you can receive notifications when the alarm is triggered.
# SNS Topic for CloudWatch Alarms
resource "aws_sns_topic" "user_alarms" {
  name         = var.sns_topic_name
  display_name = var.sns_topic_display

  tags = {
    Project     = var.project_name
    environment = var.tag_environment
  }
}

# Subscribe to the topuc via email
resource "aws_sns_topic_subscription" "notify_user_sql_err_email" {
  topic_arn              = aws_sns_topic.user_alarms.arn
  protocol               = "email"
  endpoint_auto_confirms = true
  endpoint               = var.sns_notify_email
}

# Subscribe to the topuc via SMS
resource "aws_sns_topic_subscription" "notify_user_sql_err_sms" {
  topic_arn              = aws_sns_topic.user_alarms.arn
  protocol               = "sms"
  endpoint_auto_confirms = true
  endpoint               = var.sns_notify_sms
}
Here is the CloudWatch alarm that monitors the DB error log group for incoming errors. If the count of incoming events to my error log exceeds 20 events in a span of a minute, the alarm is triggered and our SNS topic publishes the alarm.
resource "aws_cloudwatch_metric_alarm" "mysql_error_rate_alarm" {
  alarm_name                = var.cw_alarm_name
  alarm_description         = var.cw_alarm_desc
  comparison_operator       = "GreaterThanOrEqualToThreshold"
  evaluation_periods        = "4"
  metric_name               = "IncomingLogEvents"
  namespace                 = "AWS/Logs"
  period                    = "60"
  statistic                 = "Average"
  threshold                 = "20"
  insufficient_data_actions = []
  alarm_actions             = [aws_sns_topic.user_alarms.arn]

  dimensions = {
    LogGroupName = "/aws/rds/instance/${var.rds_db_identifier}/error"
  }

  tags = {
    Project     = var.project_name
    environment = var.tag_environment
  }

  depends_on = [aws_db_instance.spgl_mysql]

}
Analyze the performance of your queries
Switch on Performance Insights to monitor your queries with the performance_insights_enabled property. Having previously used New Relic and Data Dog as APM tools I can vouch for the need to monitor queries and identify the ones eating up resources. I have not used the in-house performance insight tool in AWS. I'd like to hear your thoughts.
And finally, the grunt work of documenting our code
My least favorite process of building infrastructure is documenting it. Every team has their own take on this. I suggest giving Terraform Docs a try. The library auto-generates a skeletal document by scanning your code. The starter doc has a list of all inputs, outputs and resources that your Terraform code creates. It might not look like much at first, but when your resources add up and your code-base grows, that doc’s going to save your life on day.
After installing the library on my Mac with brew I ran this command to generate a skeleton doc for my Terraform code.
terraform-docs markdown table --output-file README.md --output-mode inject ./
You can check out the Readme file in the code repo linked in this article.
Finally, after you’ve run this code your configuration panel on the database should look like this. The screenshot shows details about pretty much everything we discussed here.
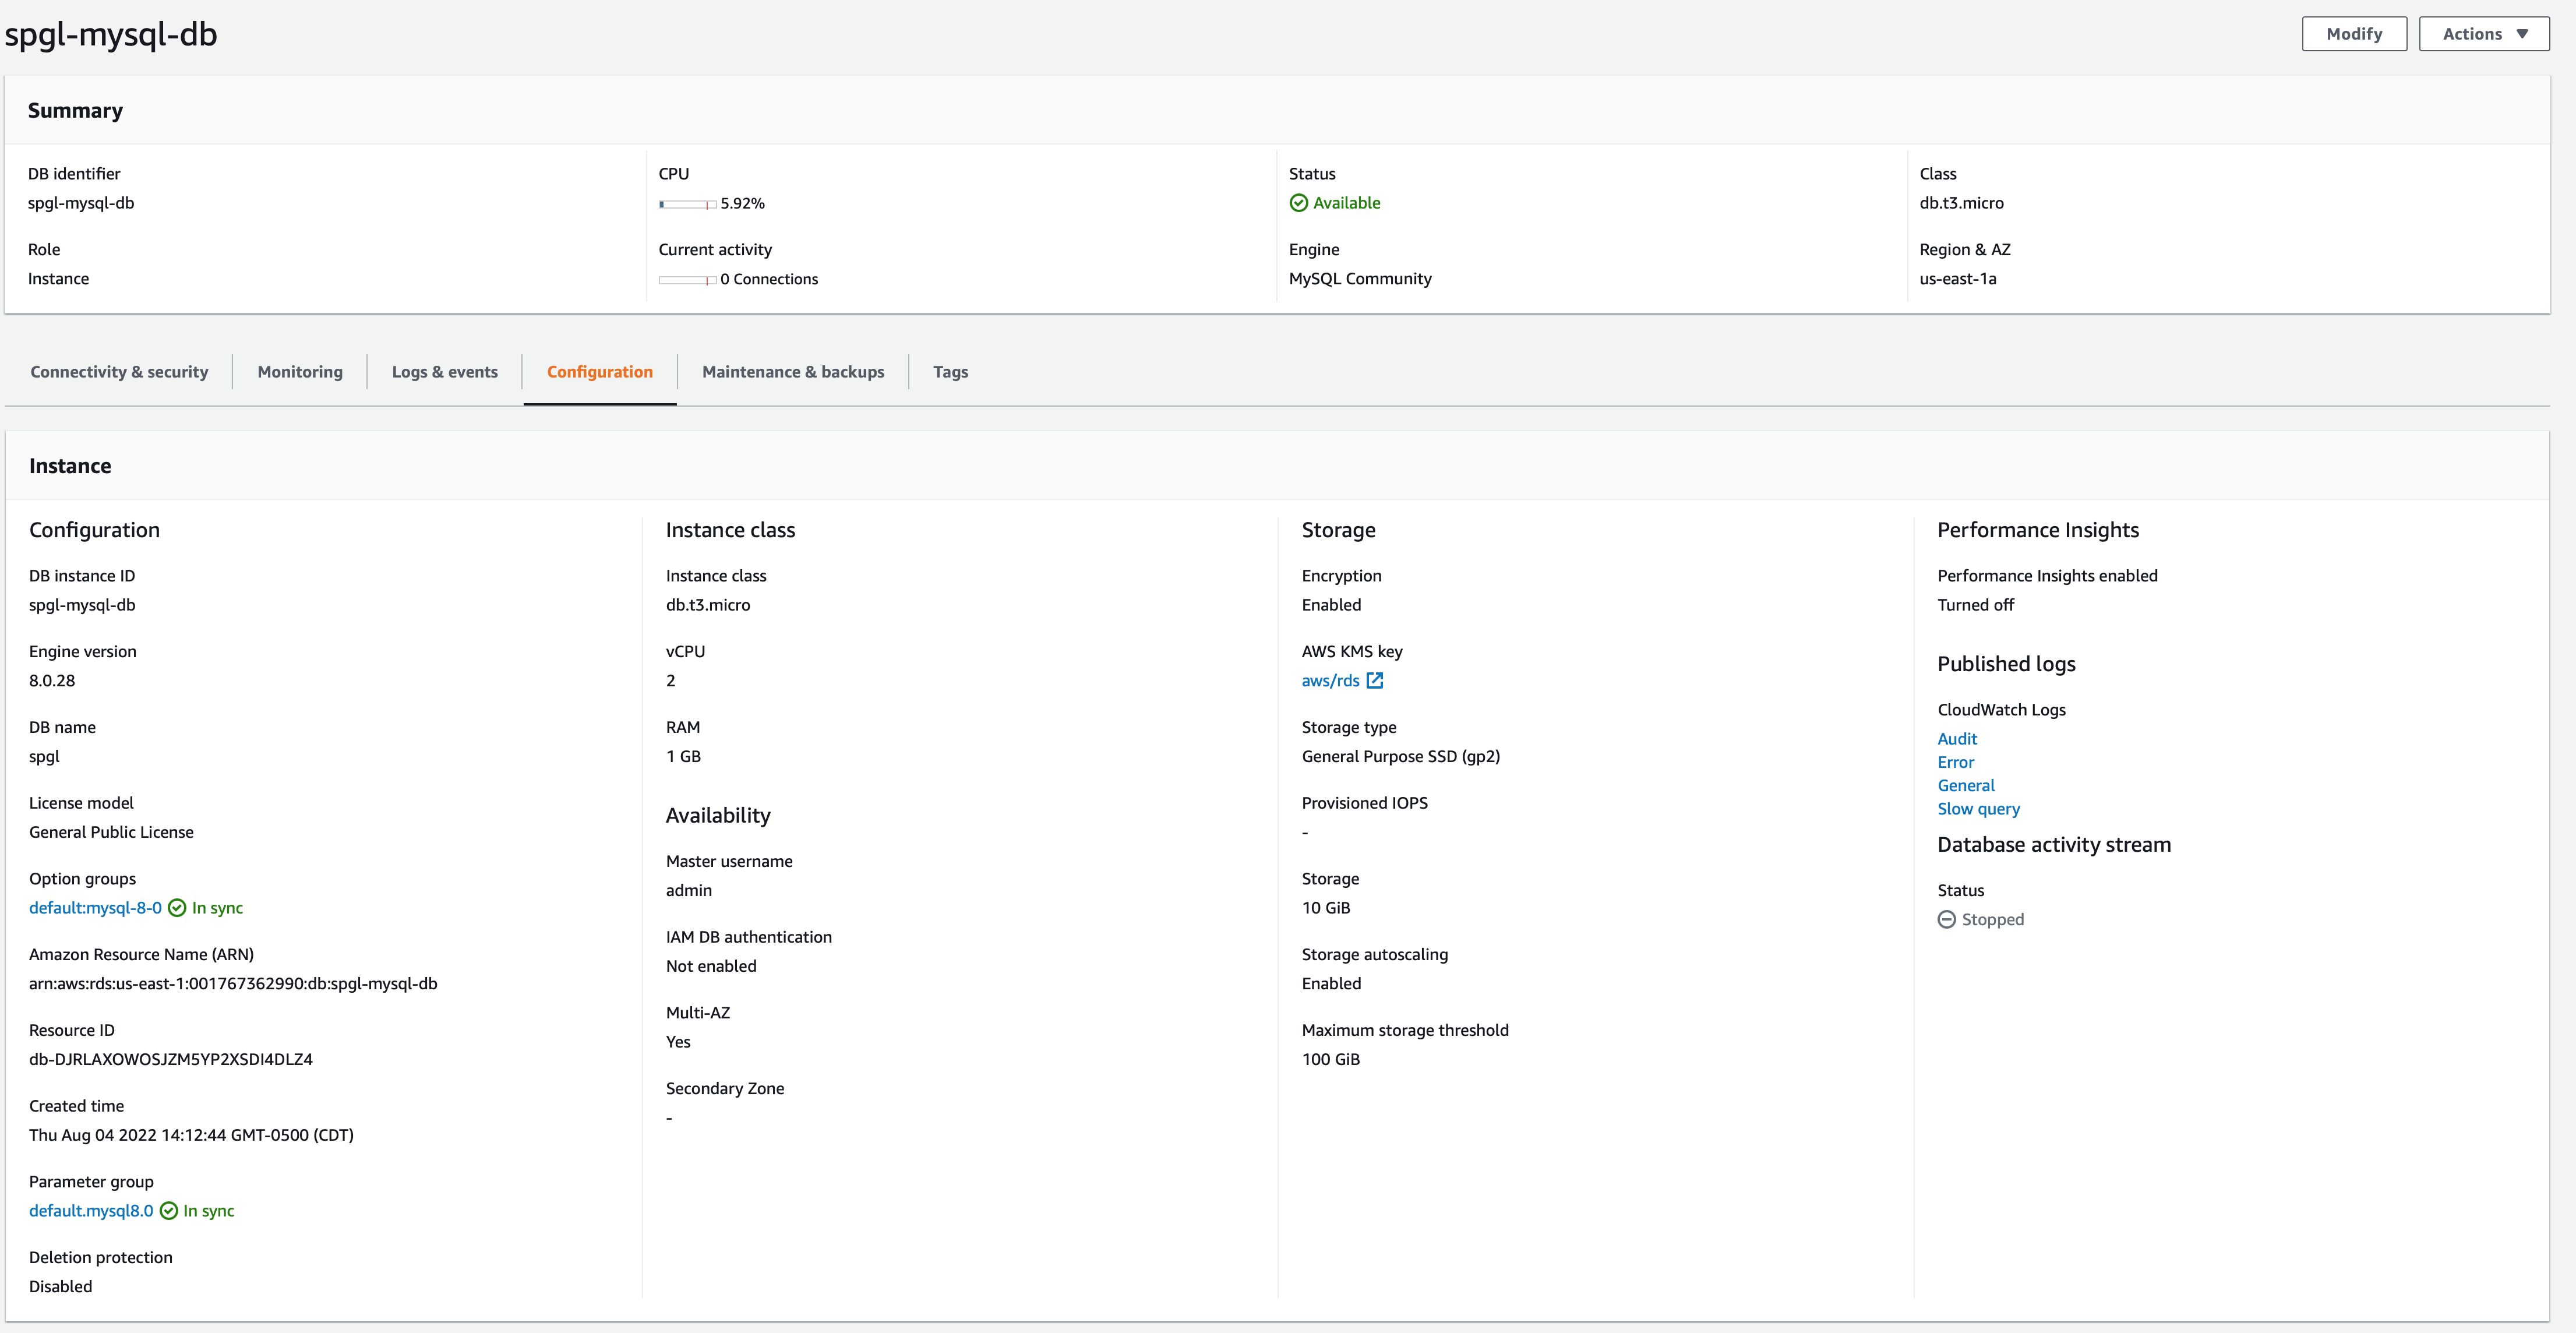 Image 5 - Config panel on a Mysql Instance
Phew, at the end of this article, you should have an encrypted Mysql Database in AWS that scales as your data grows, fails over to a standby in case of a failure, captures a good chunk of logs and auto-monitors for errors. Not bad for an hour of work.
As always if you have any questions or suggestions please DM me @sandeep_gopal or drop me an email