How to Cloud - Instantly Set up a VPC for public and private traffic
July 10, 2022
In this article, we'll create a new VPC from scratch. We'll divvy up the network into two sub-networks or subnets, one public and one private in two different availability zones. Our public subnet will be open to internet traffic. On the other hand, our private subnet will filter out internet traffic. You can host sensitive code, a database or any resource that should be hidden from internet traffic. We'll accomplish this using the AWS console as well as Terraform, so you're aware of both methods. Let's get building.
Here's an architecture diagram of my setup.
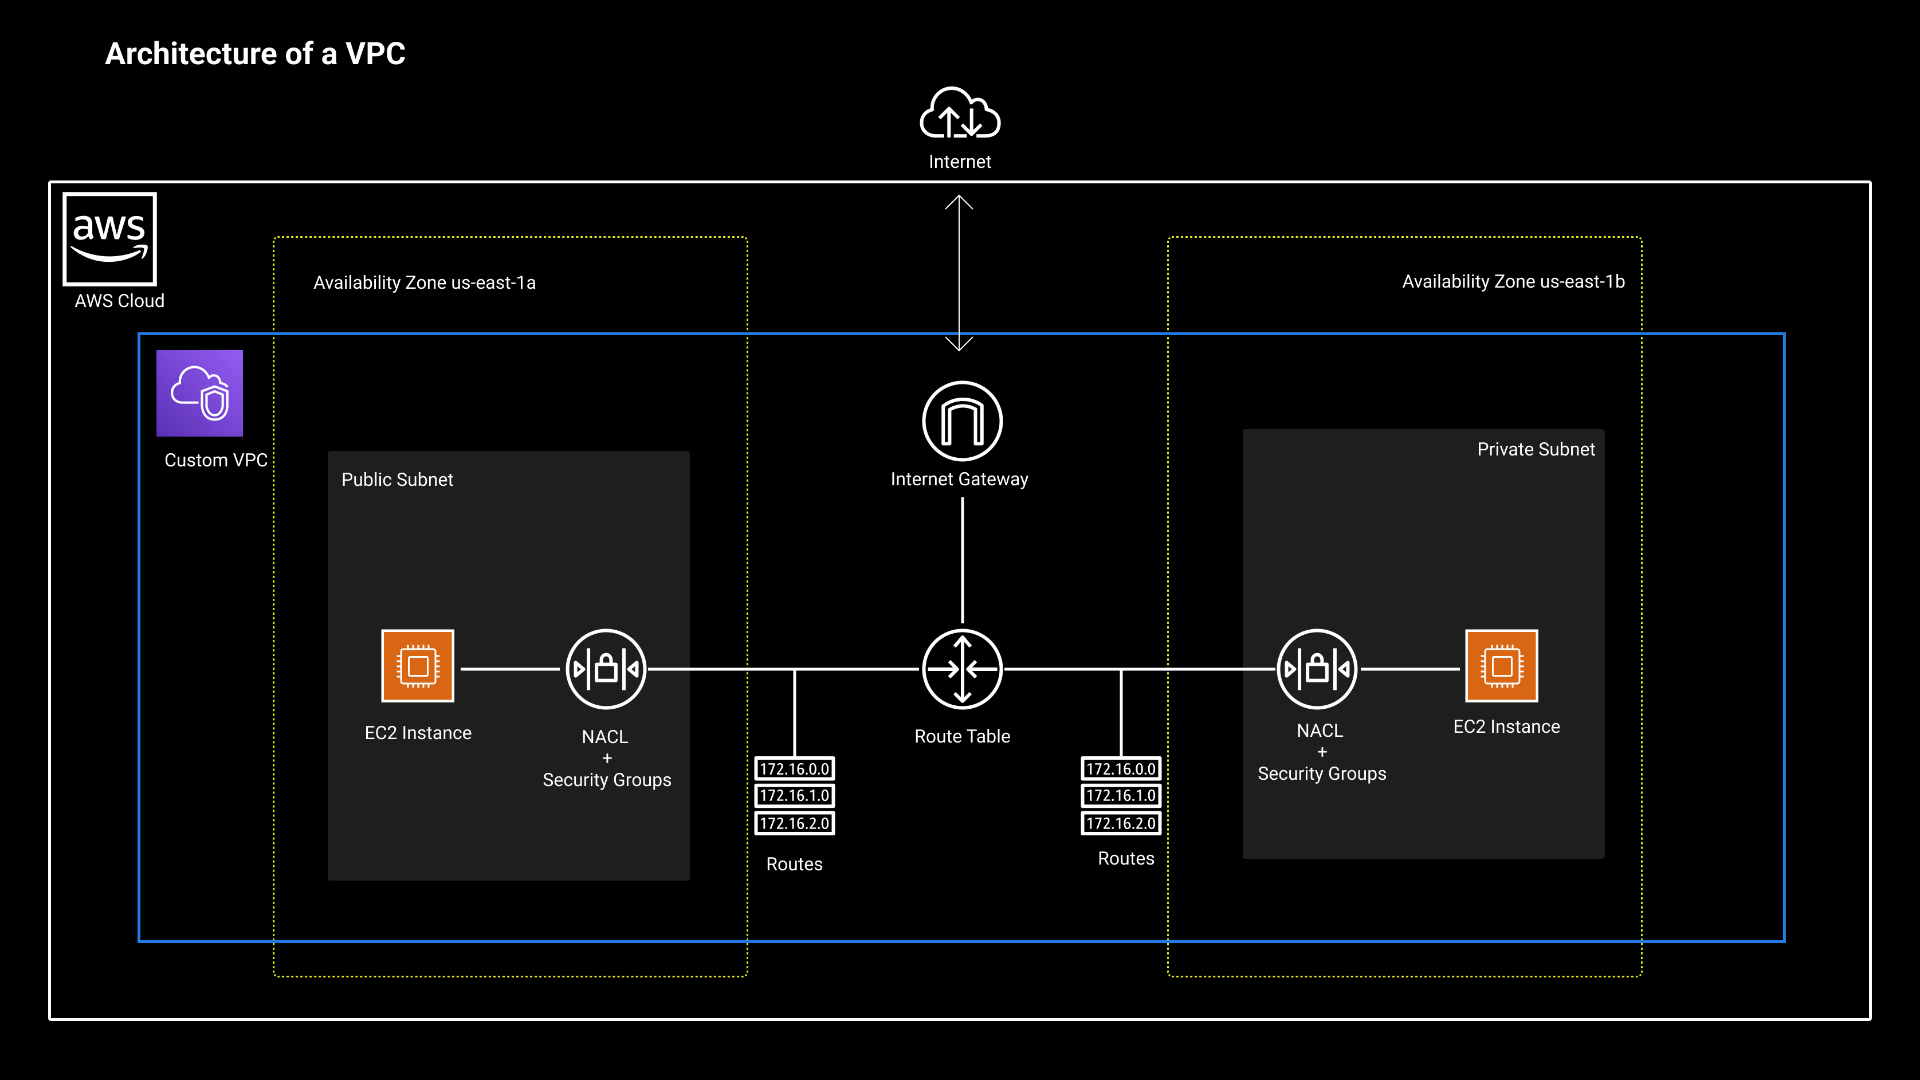
VPC basics
A Virtual Private Cloud, or VPC, is an internal network that is programmatically cordoned off from the rest of the larger AWS network. Inside a VPC, we add servers, databases or containers, any infrastructure our application needs. Creating versatile networks to suit any business need is an advantage of VPCs.
VPCs can operate subnets in different availability zones, control sources of traffic and carve out private sub-networks for internal or external traffic. This makes our networks resiliant and secure, which are table-stakes for running a production application today.
Code
The entire code is available at this repo.
Launching a VPC from the AWS Console
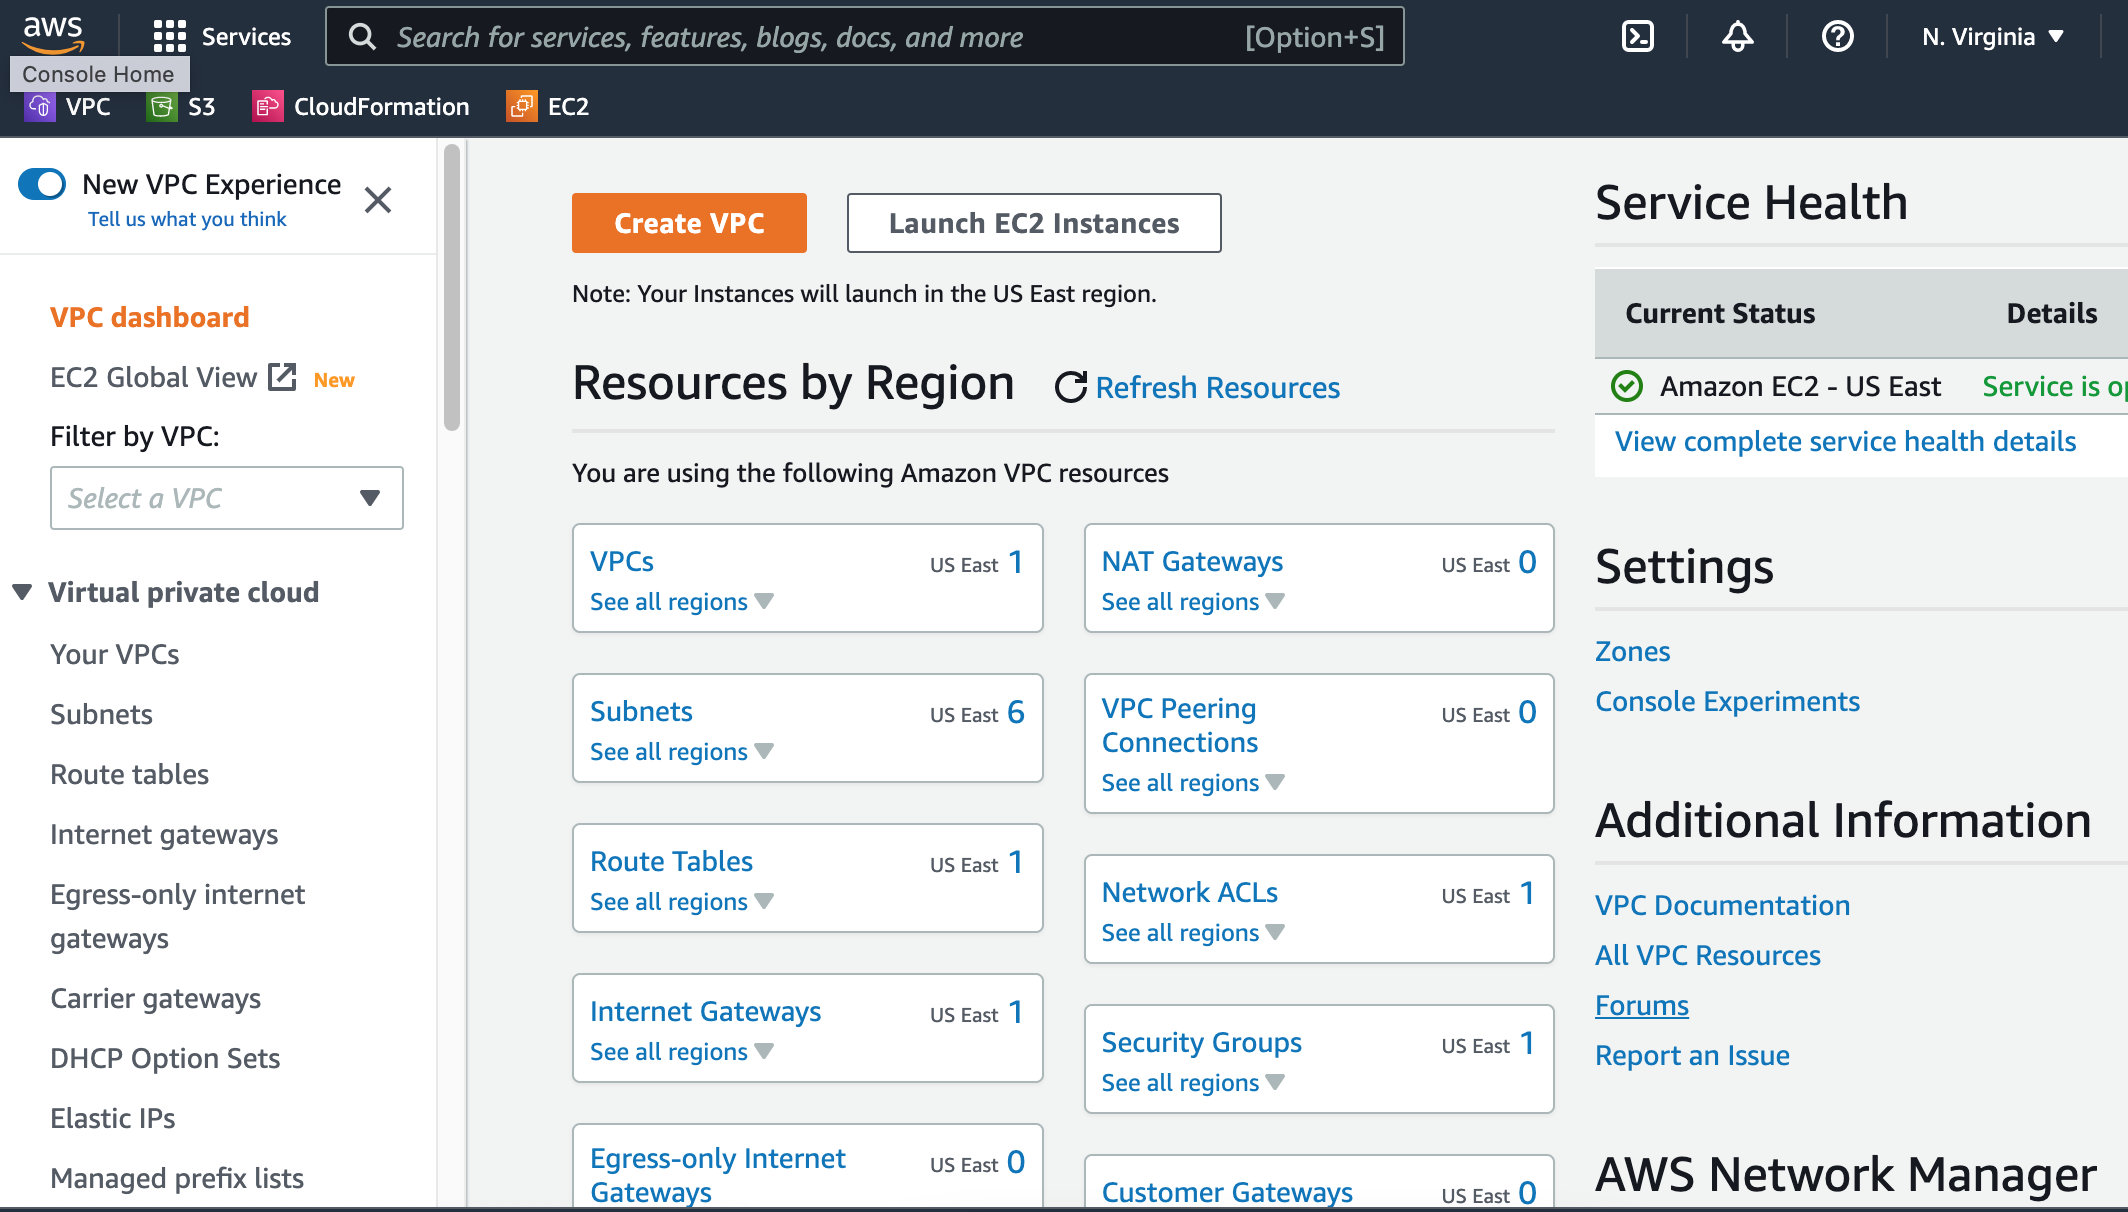
Every new AWS account comes with a default VPC that has been pre-configured by AWS. Log into your VPC dashboard of your AWS console and you'll see atleast one VPC, several subnets, a NACL (Network Access Control List), an Internet Gateway, a Route table and a Security Group. A VPC, in it's default state, is open to all incoming and outgoing traffic.
First, head to your AWS console and navigate to the VPC section. If you haven't touched this section before, it should look something like this.
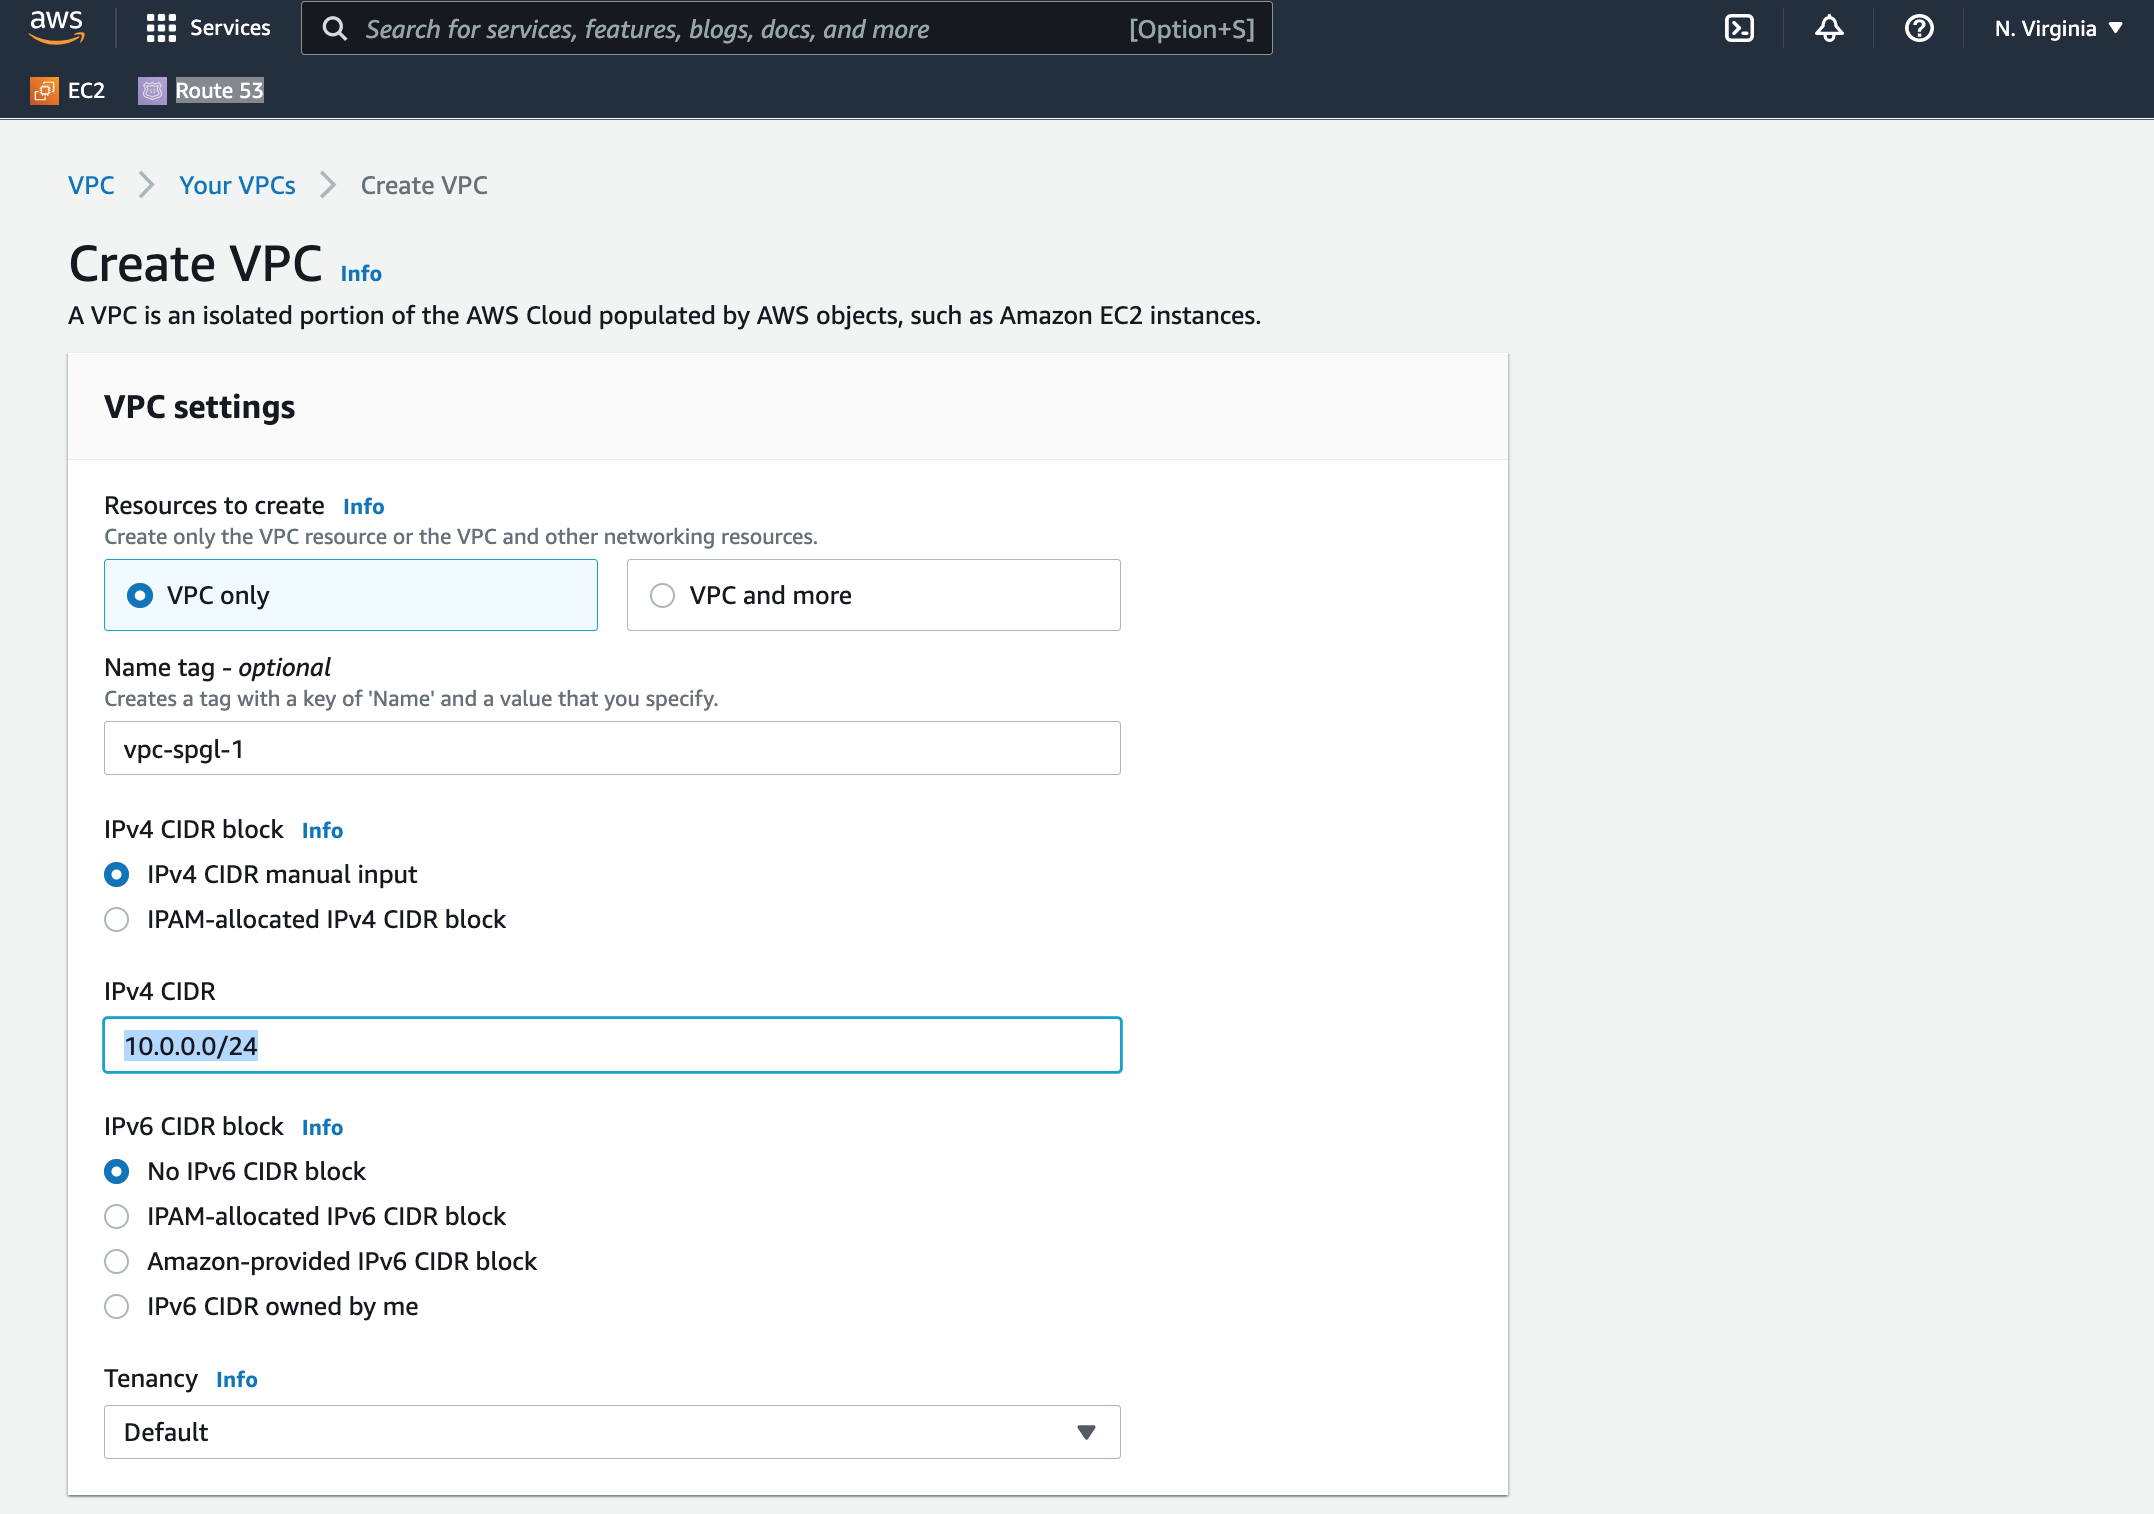
Step 1: Create a new VPC from scratch.
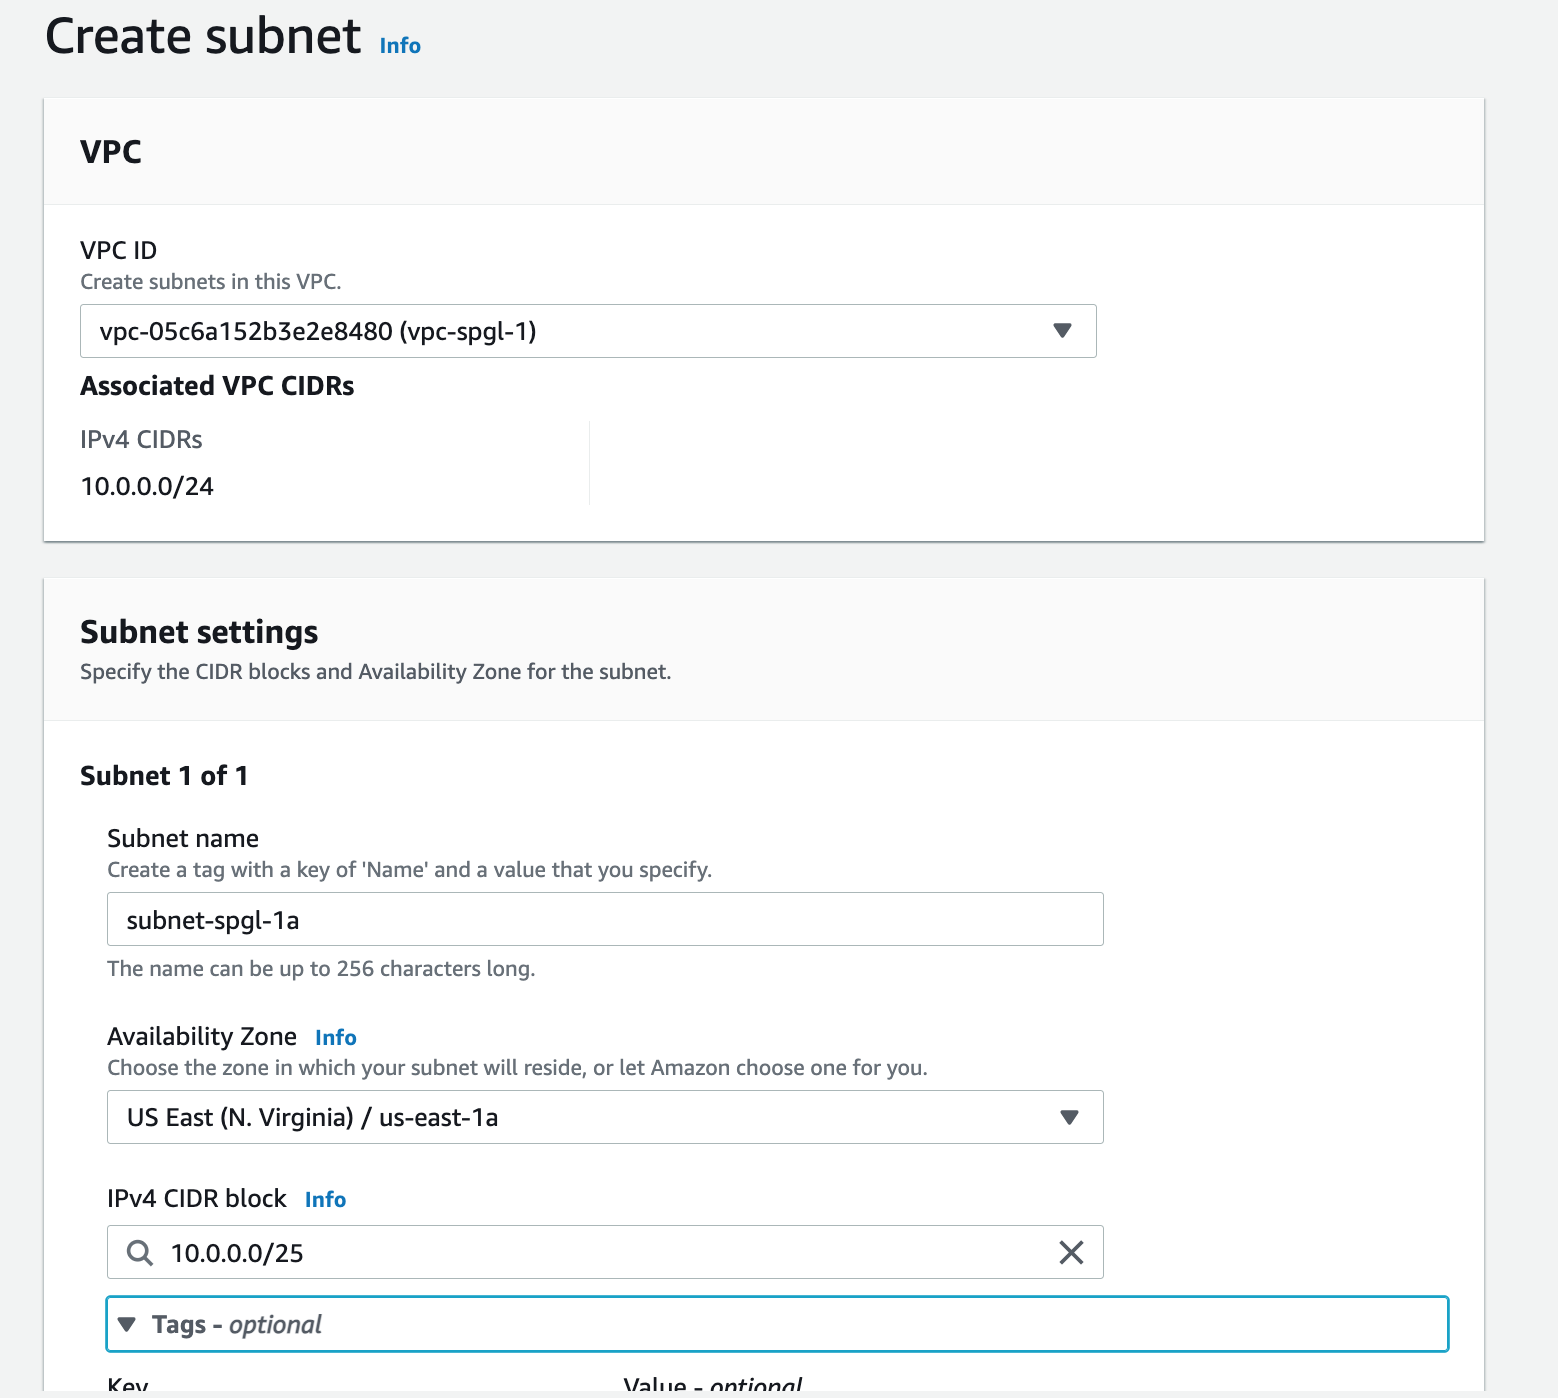
Create a new VPC with a default tenency and choose an IpV4 range of 10.0.0.0/24. This CIDR block gives us about 253 usable IPs for all our resources, enough for a simple application. Give your VPC a name you'll remember, it's easier to associate the rest of the network components with the right VPC, especially when you have more than one VPC
Step 2: Attach a new Internet Gateway
A VPC requires an Internet Gateway to communicate with the internet. Click on Internet Gateway on the sidebar of the console, and on the gateway admin, create a new Gateway. When it's complete, attach the gateway to your new VPC

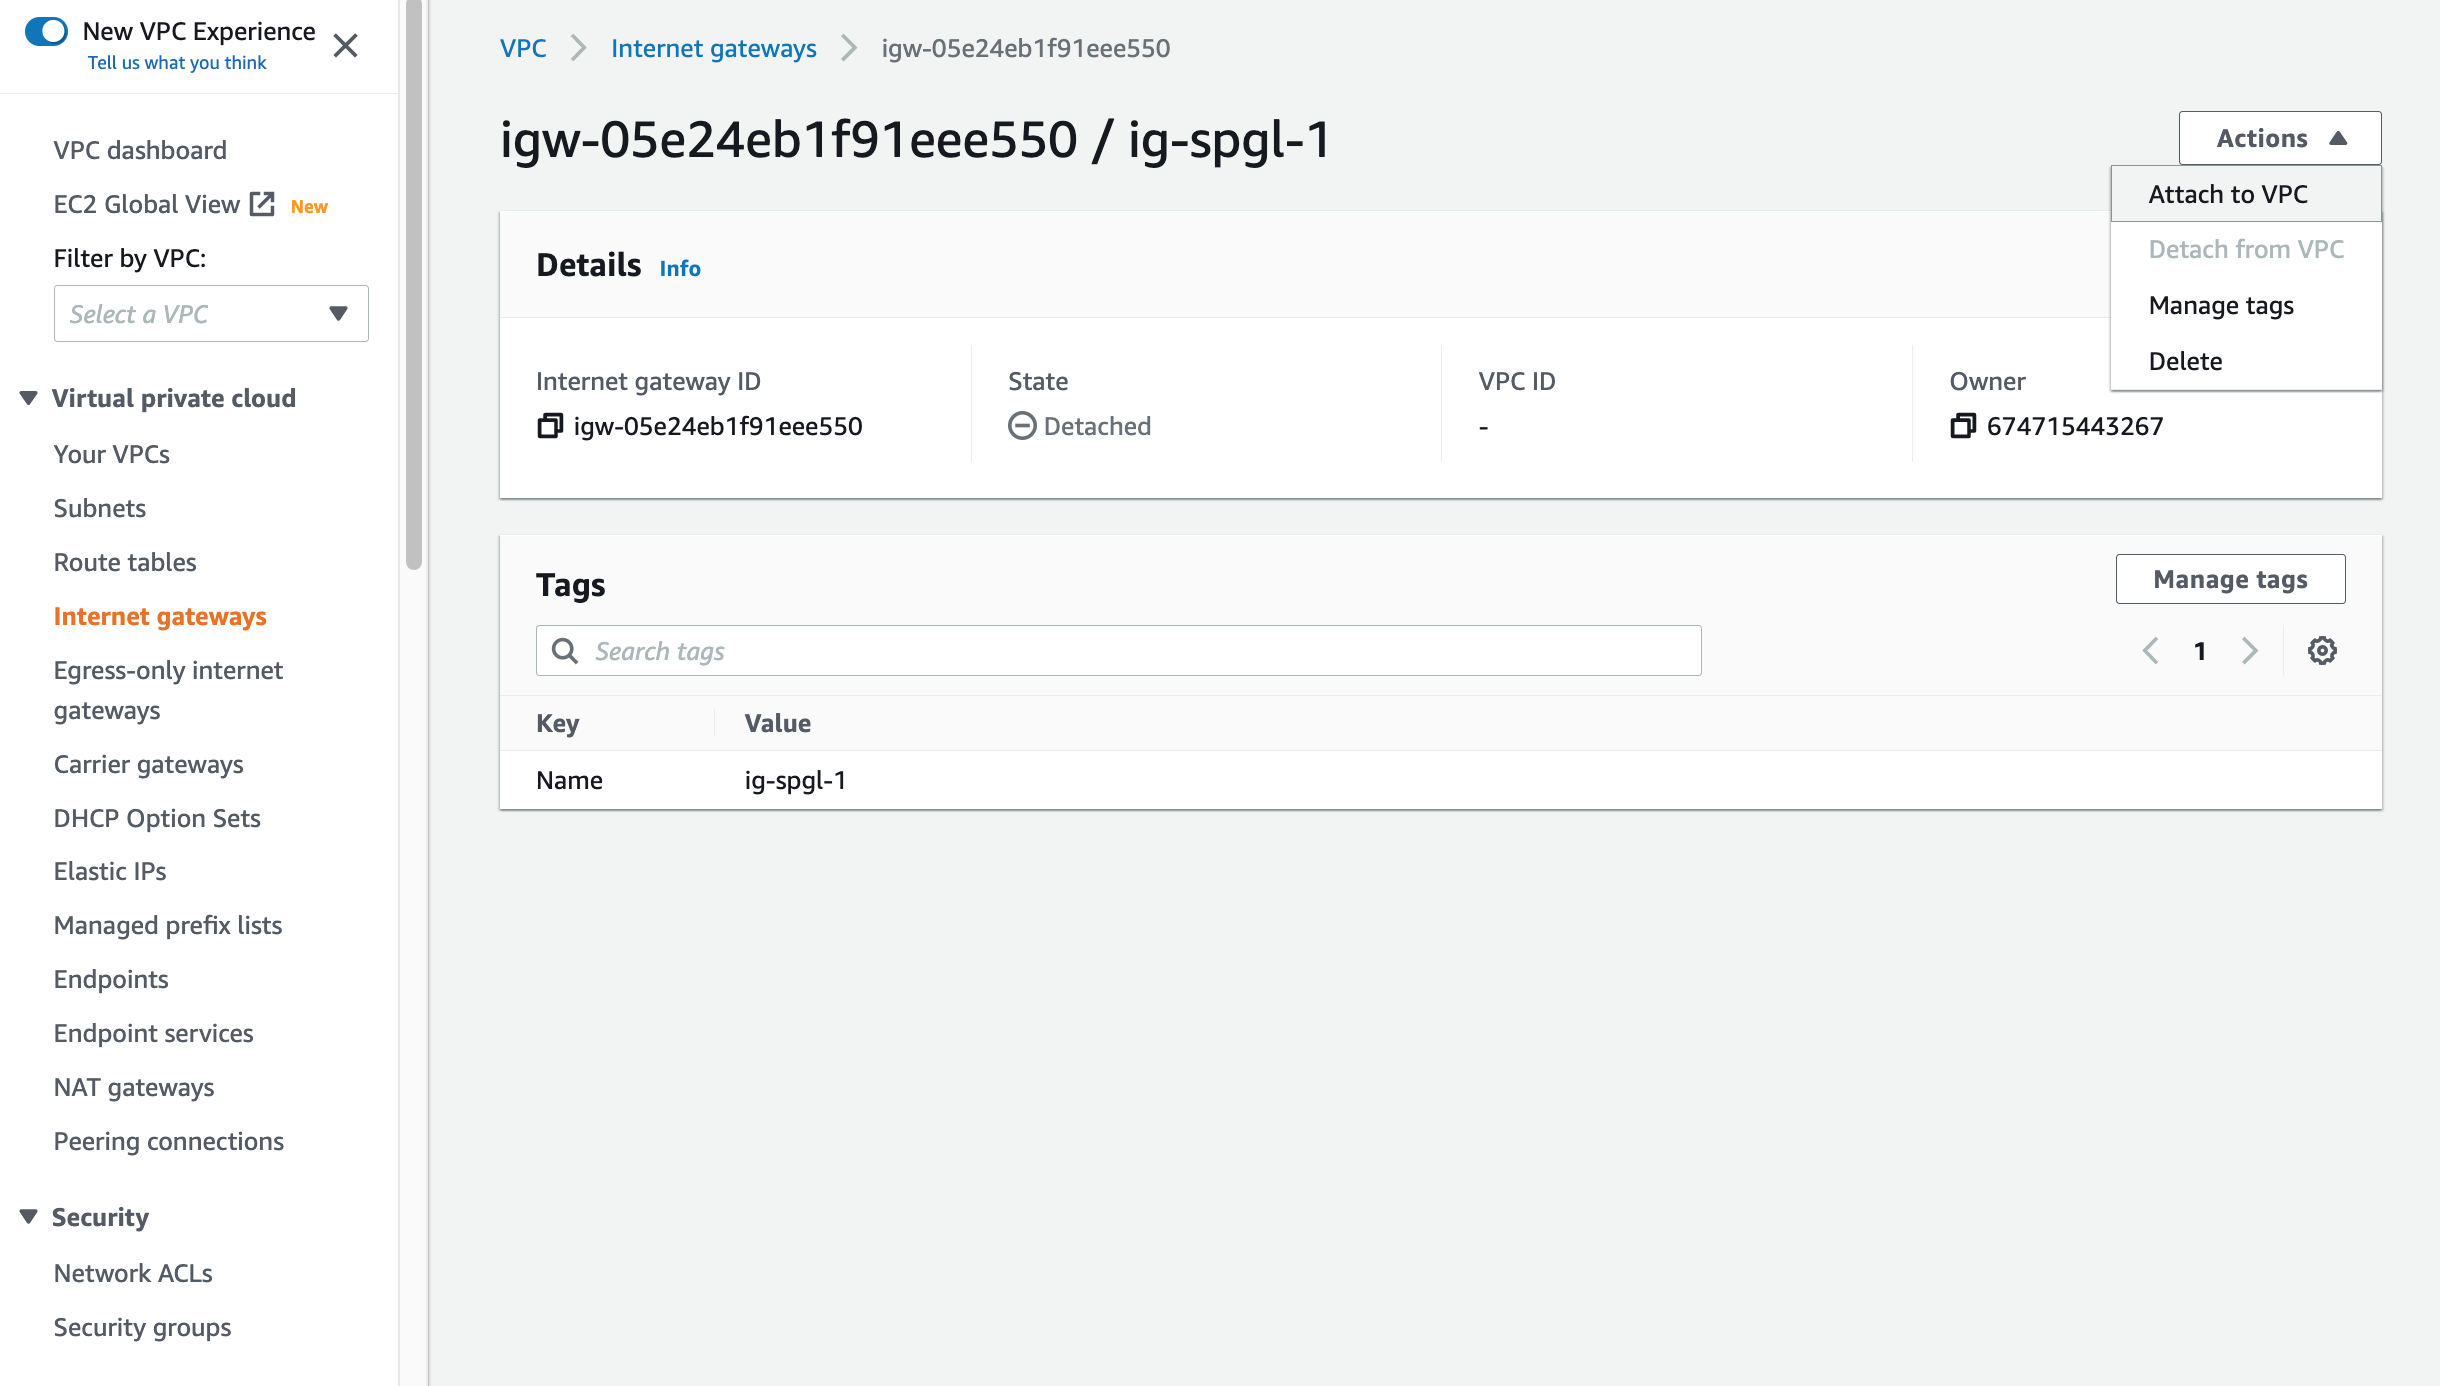
Click on the dropdown to attach it to your VPC
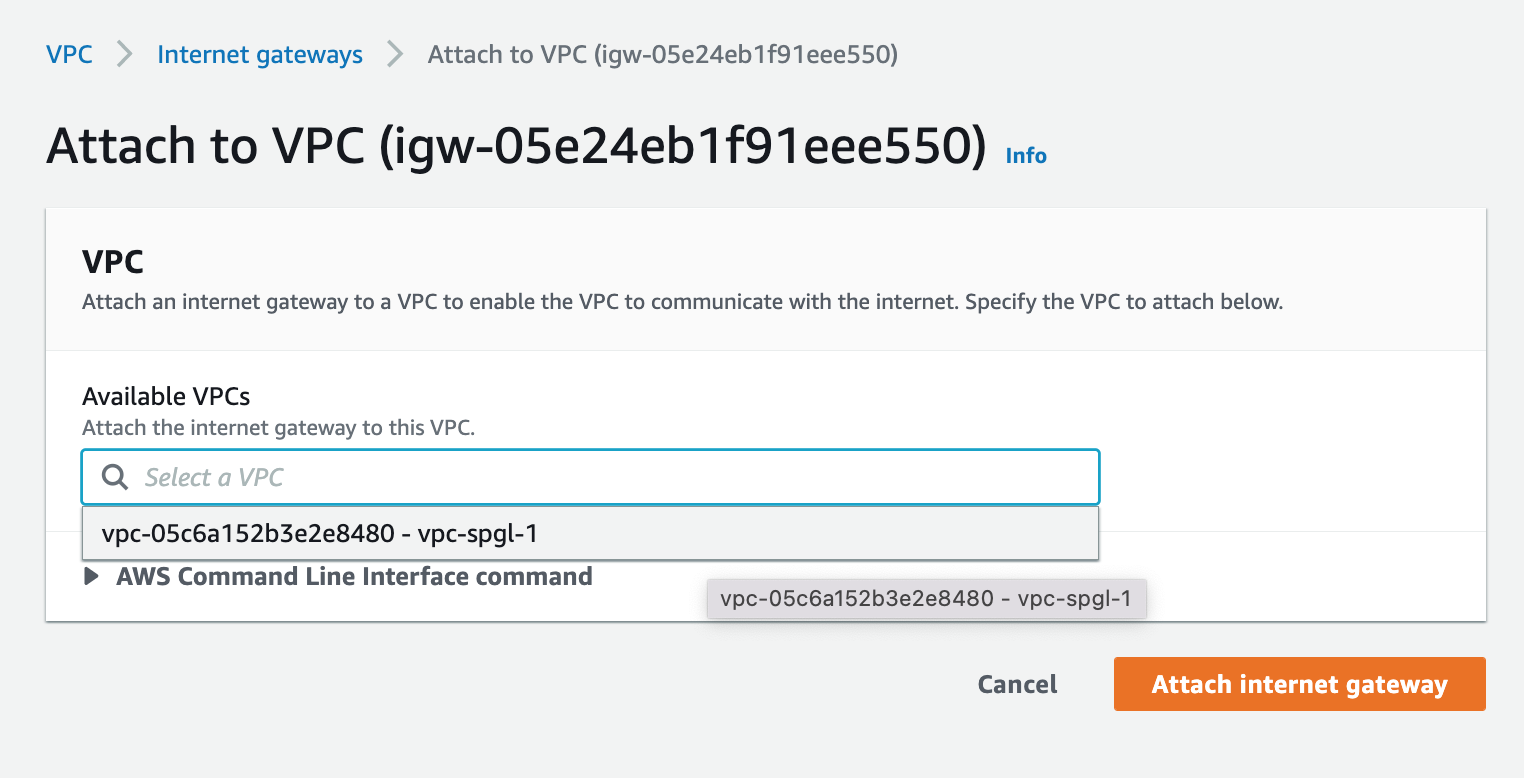
Select the VPC you just created.
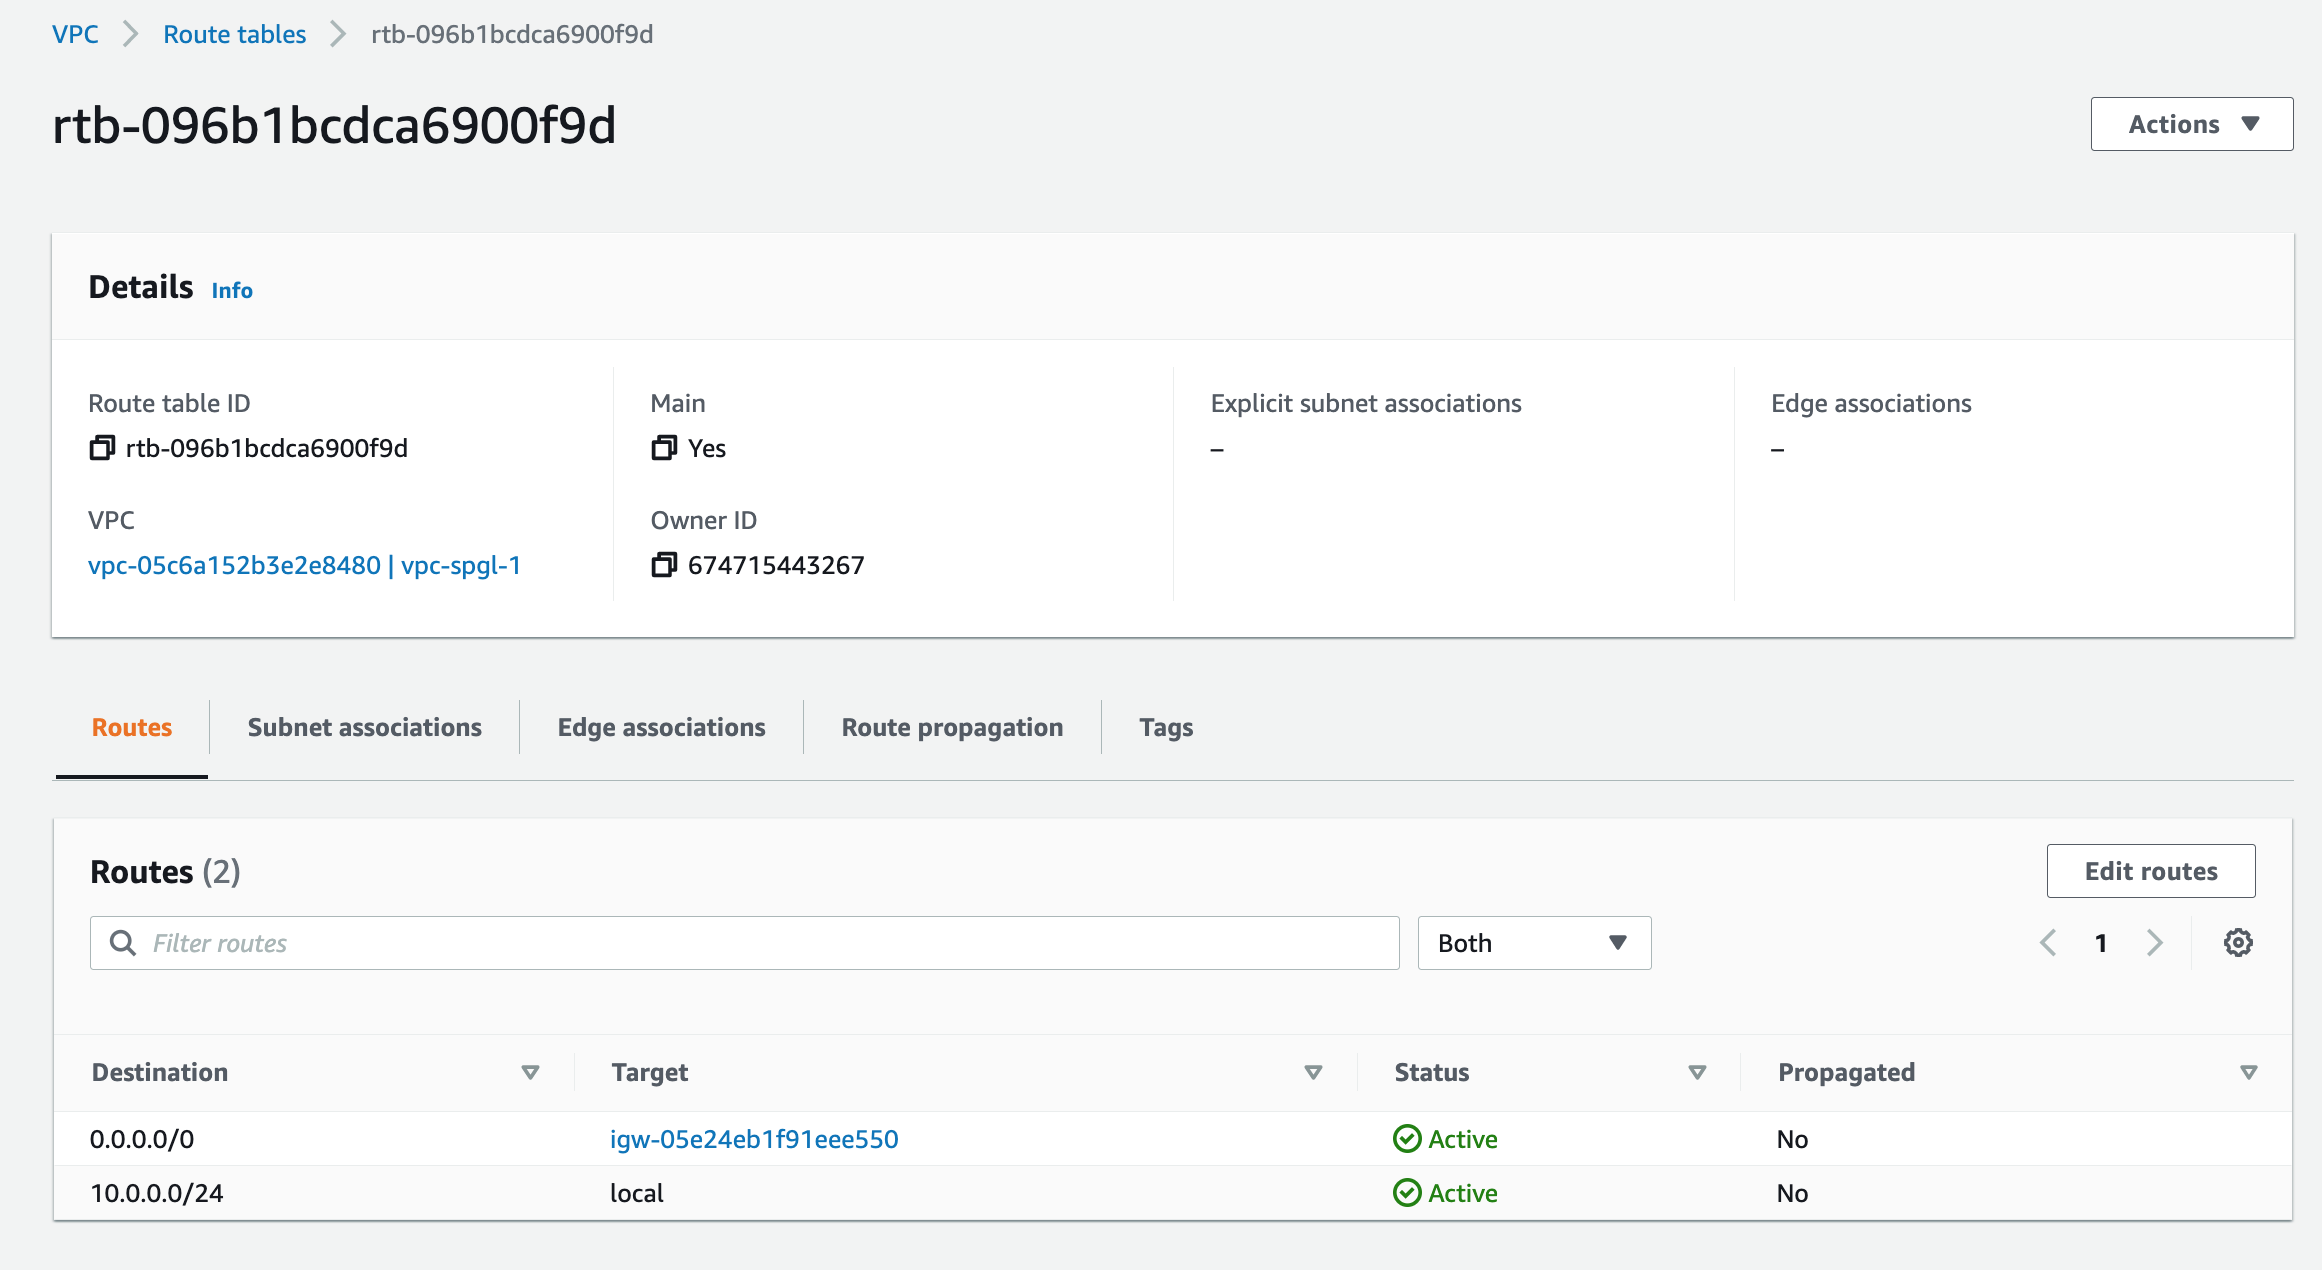
Step 3: Route table accepts Internet Traffic
A Route table, as the name suggests, is a table of routes that directs network traffic to and from a VPC. Every VPC comes with a main or default route table. You may stick with the one assigned or create a new table. We are going to locate the one attached to our VPC and edit the routes to allow internet traffic to and from the gateway we recently added.
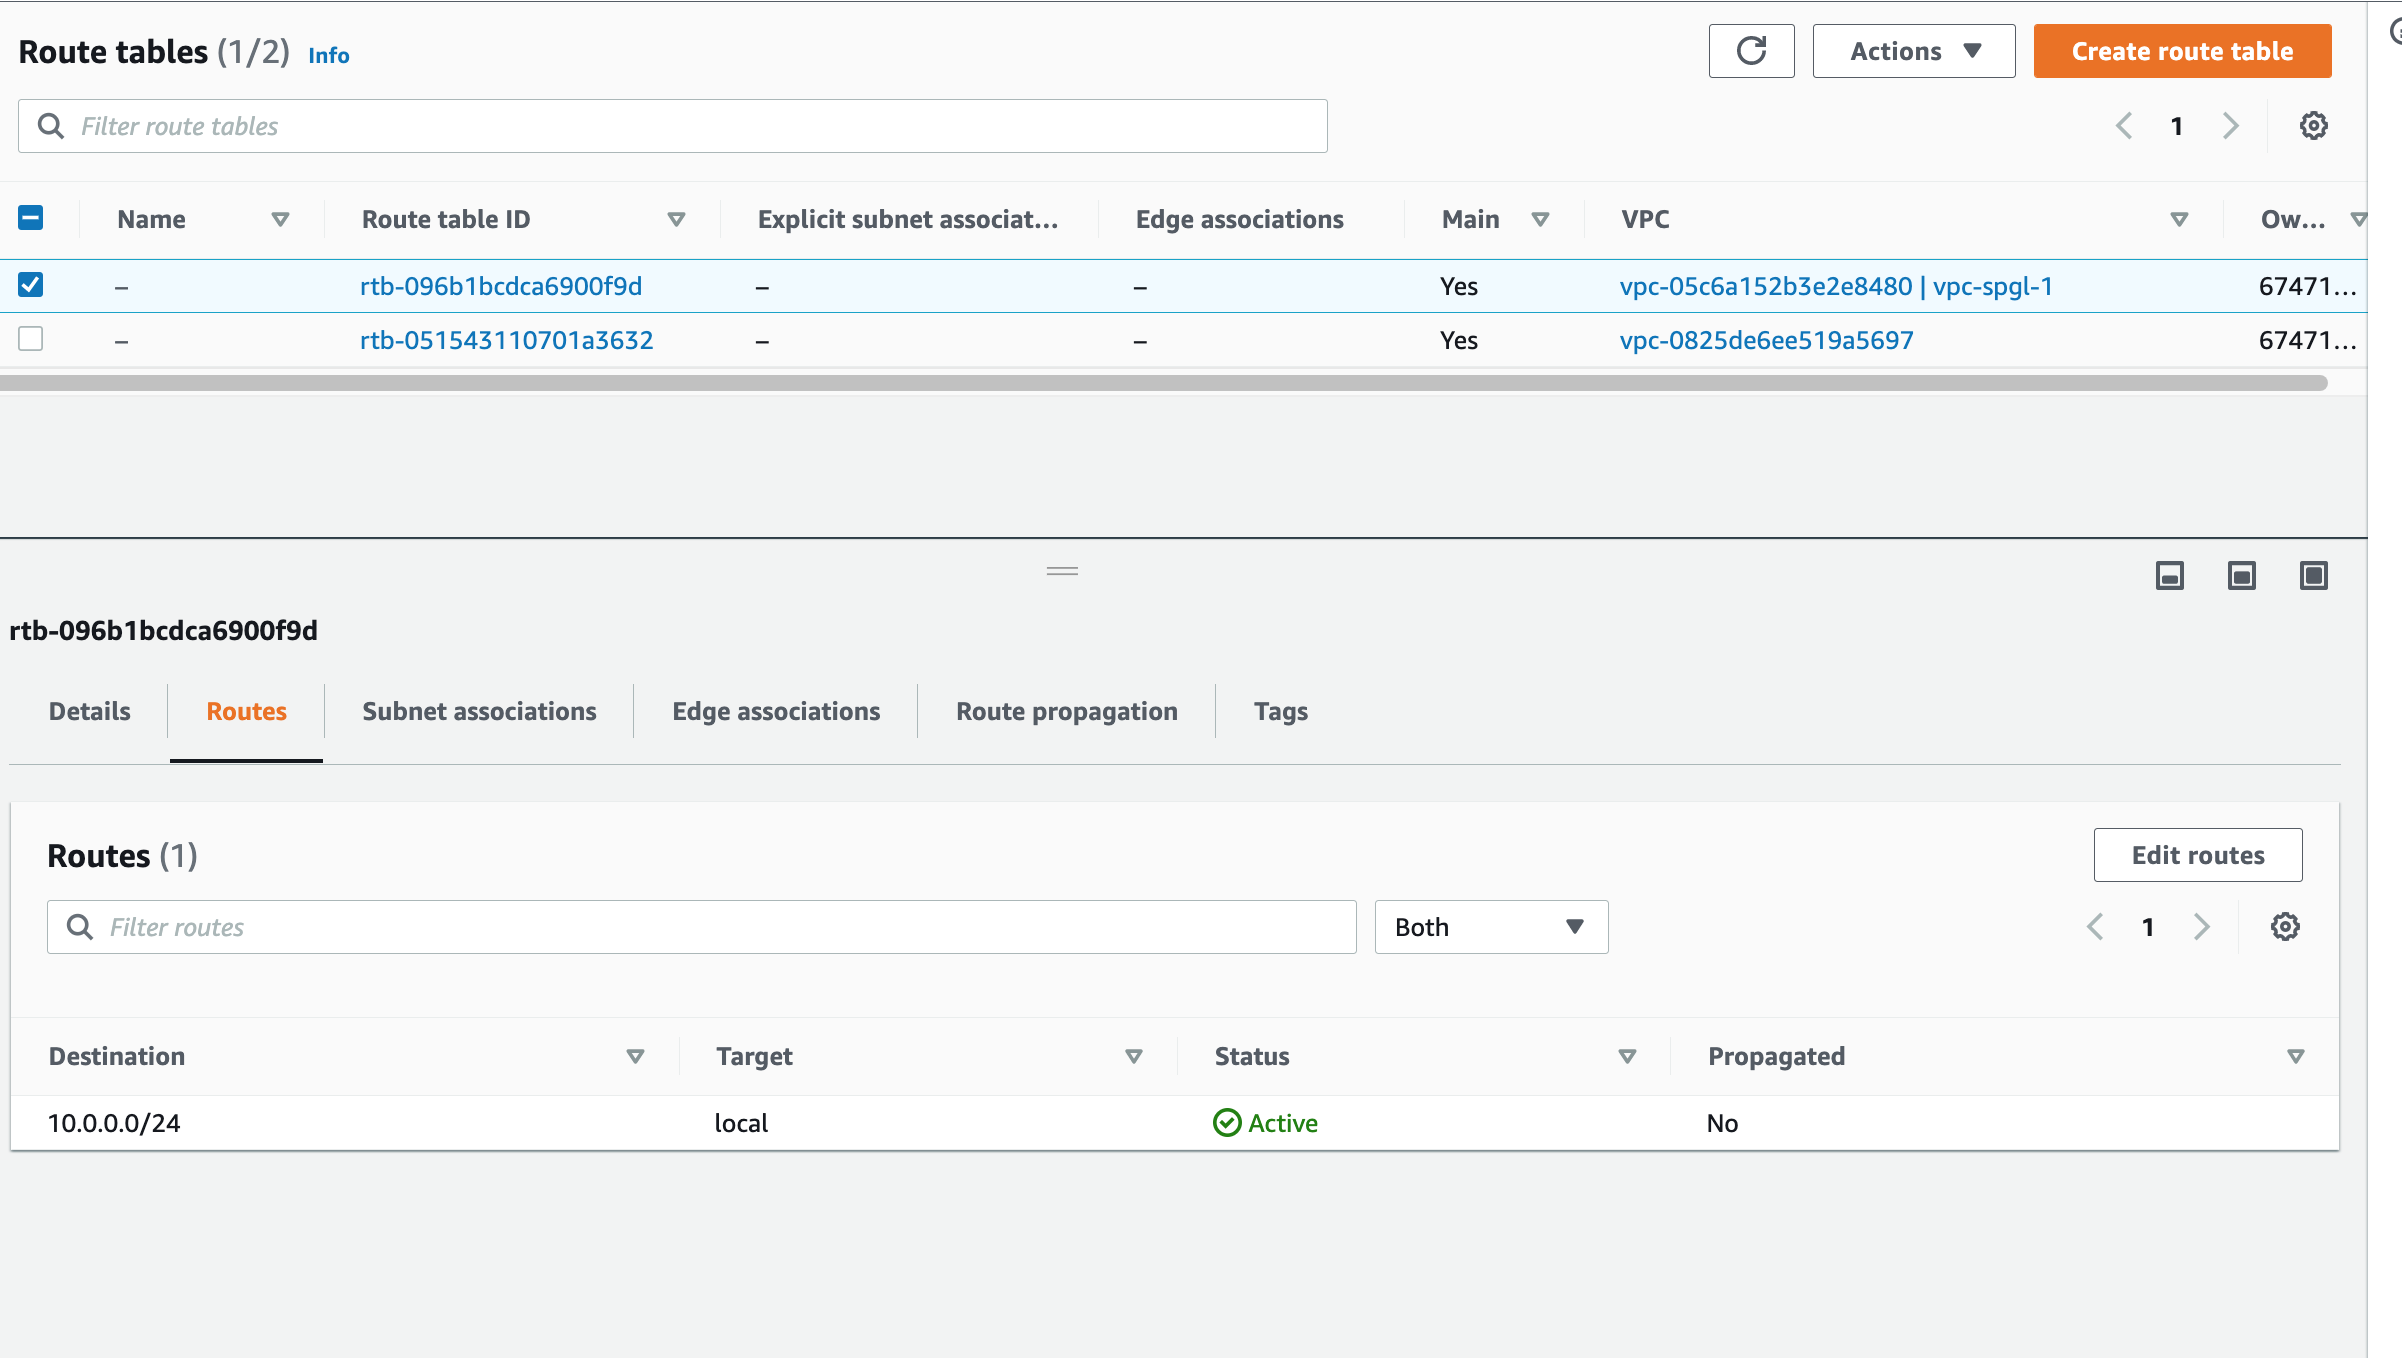
Click "Edit Routes" to add the gateway
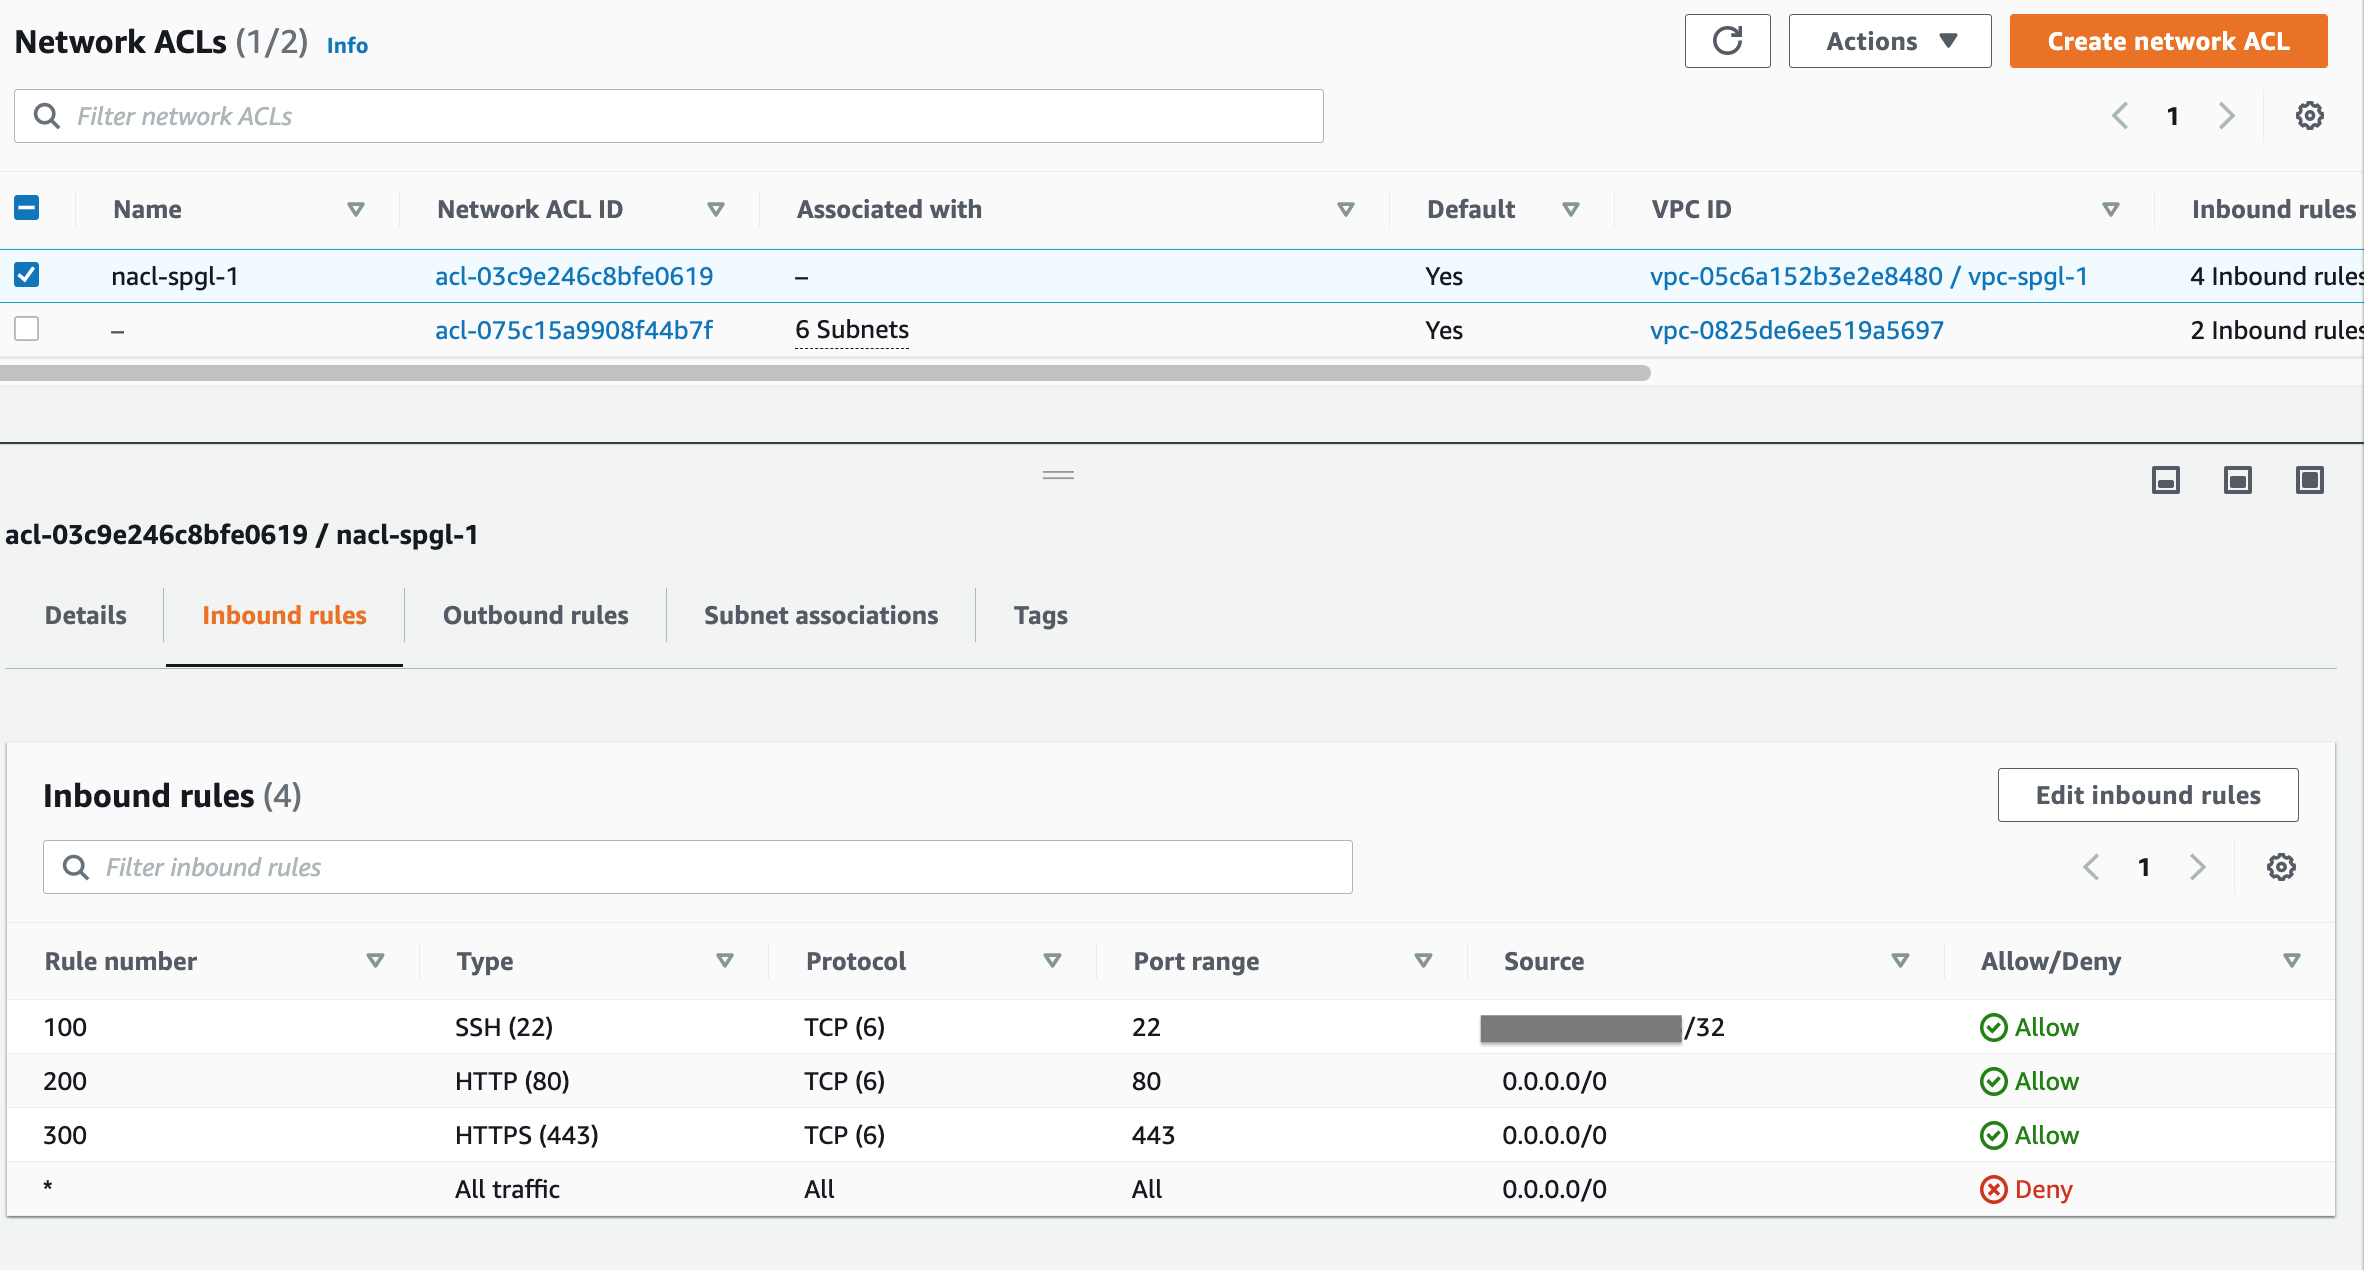
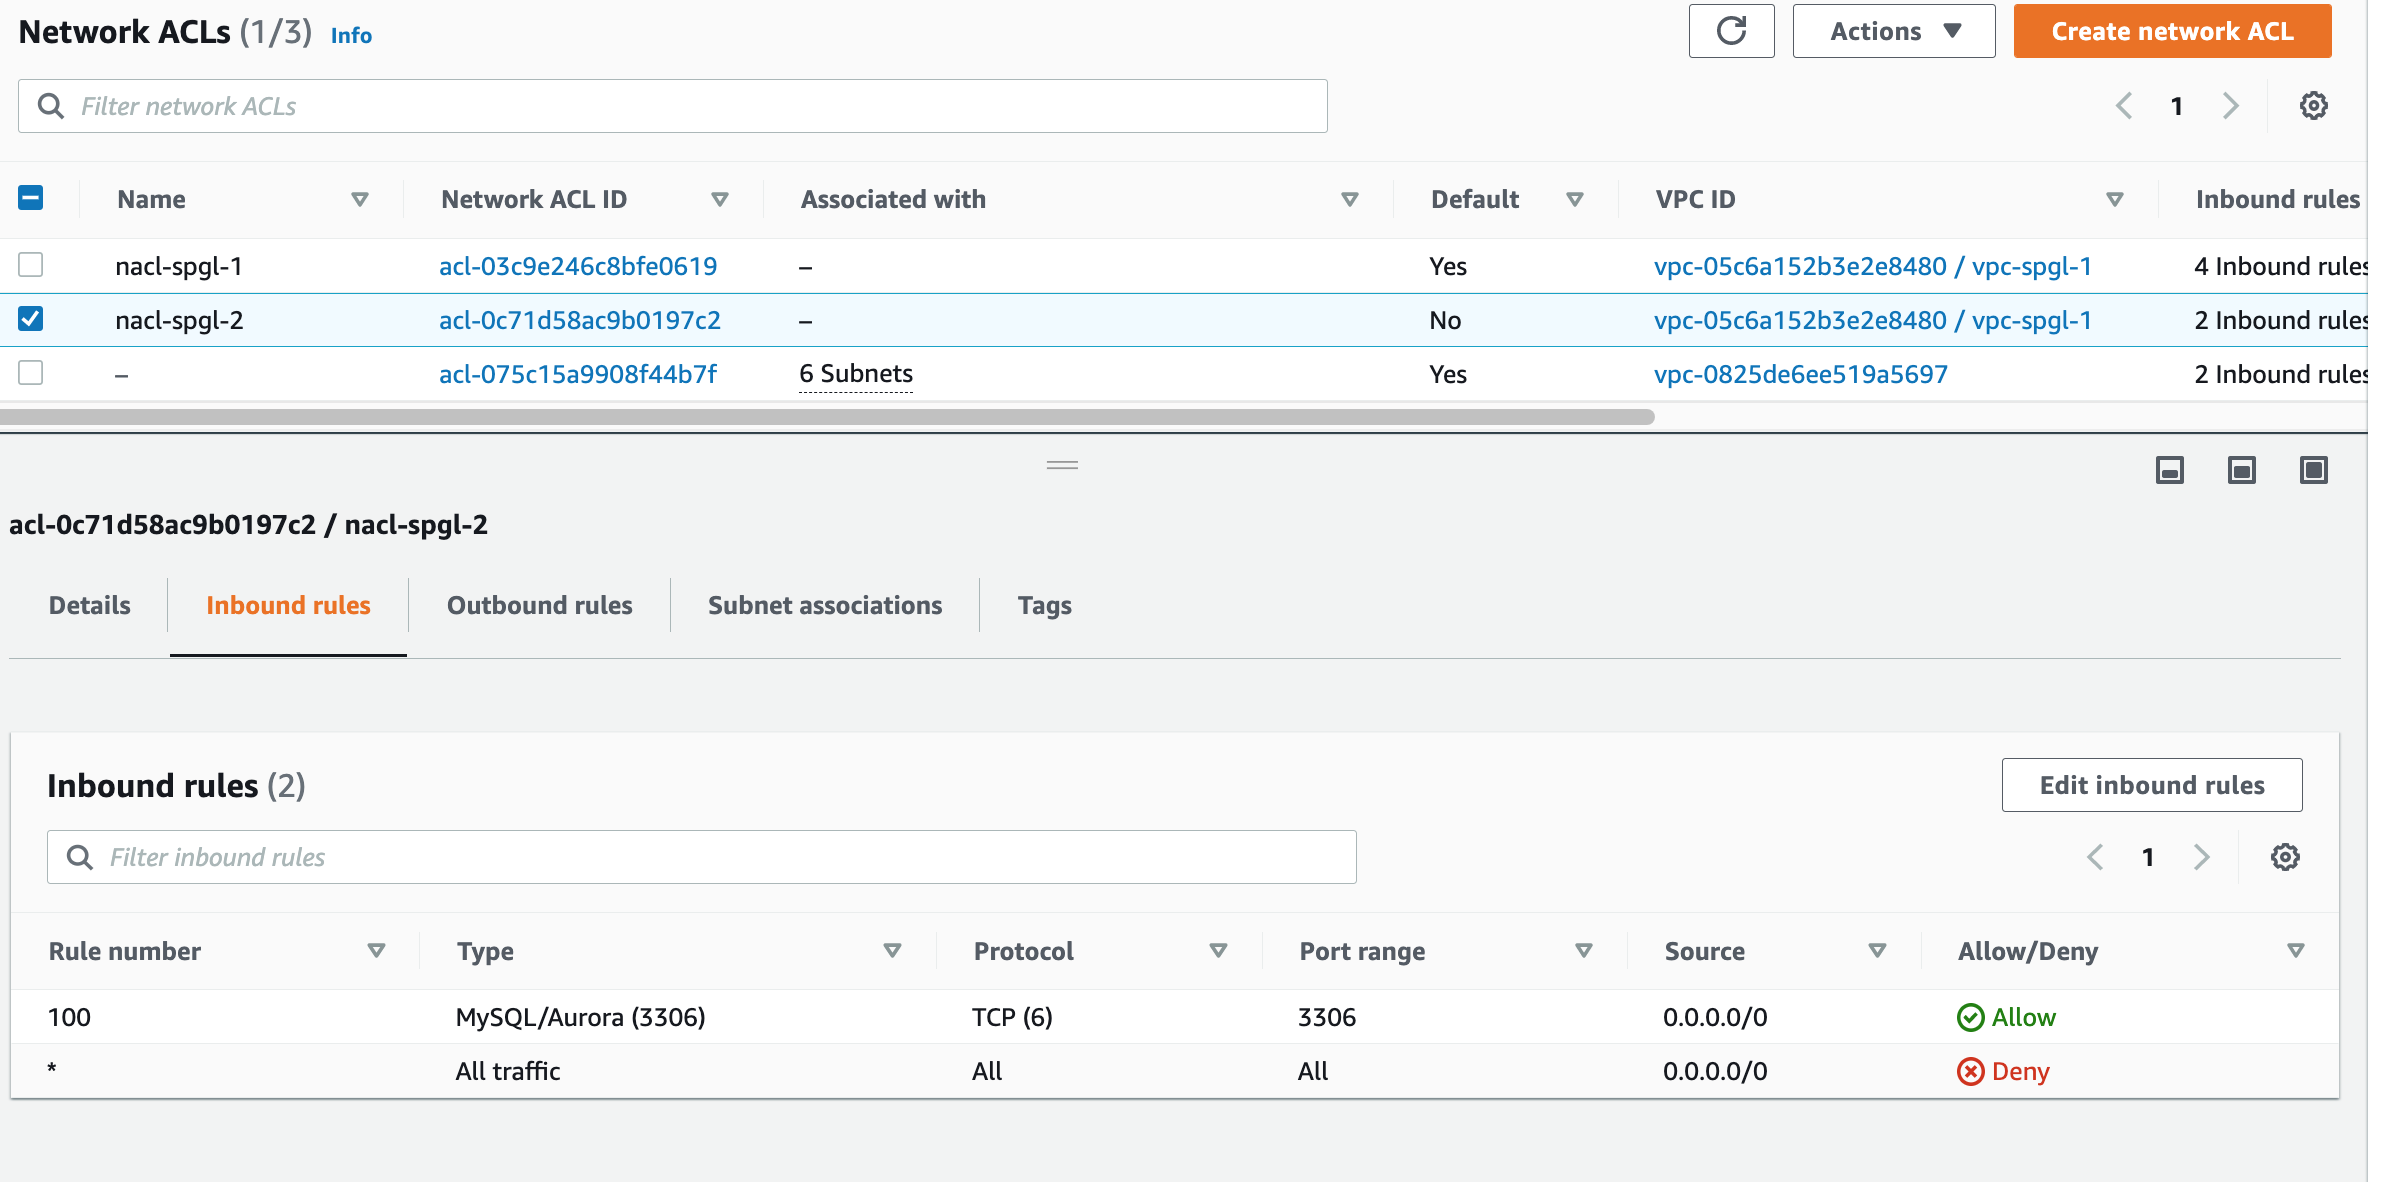
Step 4: Create a NACL and add Traffic Rules
A Network Access Control List, or NACL, is a firewall for a subnet. You can choose the types of traffic (HTTP, SSH, MYSQL) you want and deny the rest.
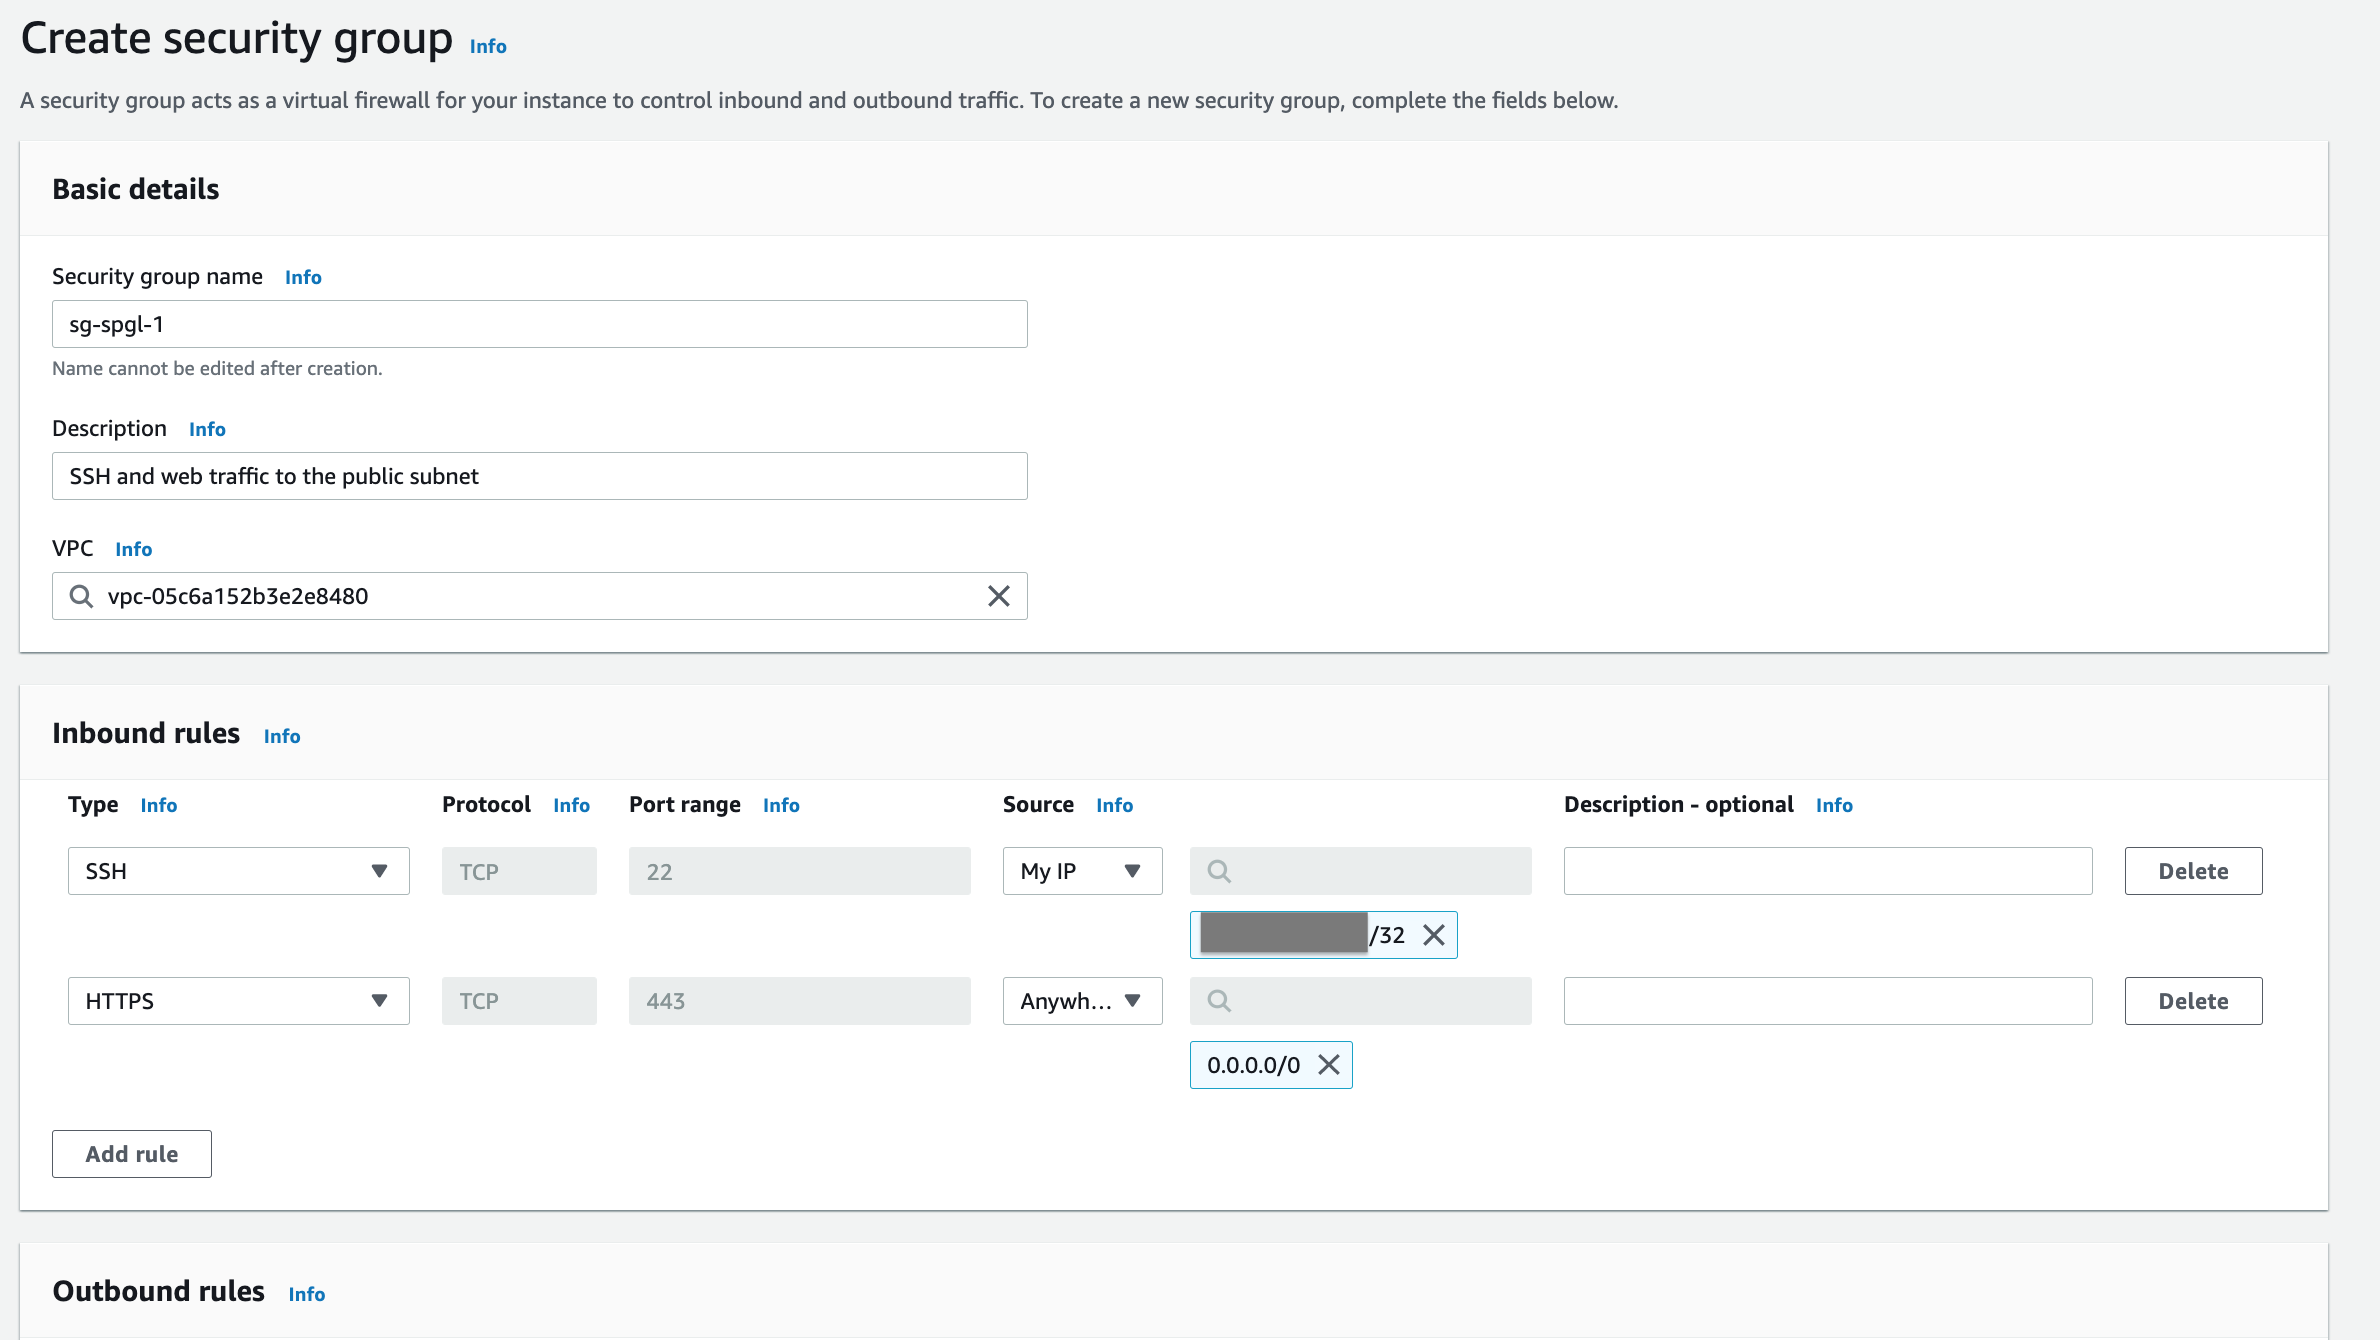
Adding individual NACLs to each subnet gives us fine-grained control to different sections of our network. The first NACL we create will pass through SSH and Web traffic and drop everything else. You should restrict SSH traffic to and from your home or office IP.
A second NACL for our private subnet will allow only Mysql traffic for now. This is a placeholder rule and we can tweak it later.
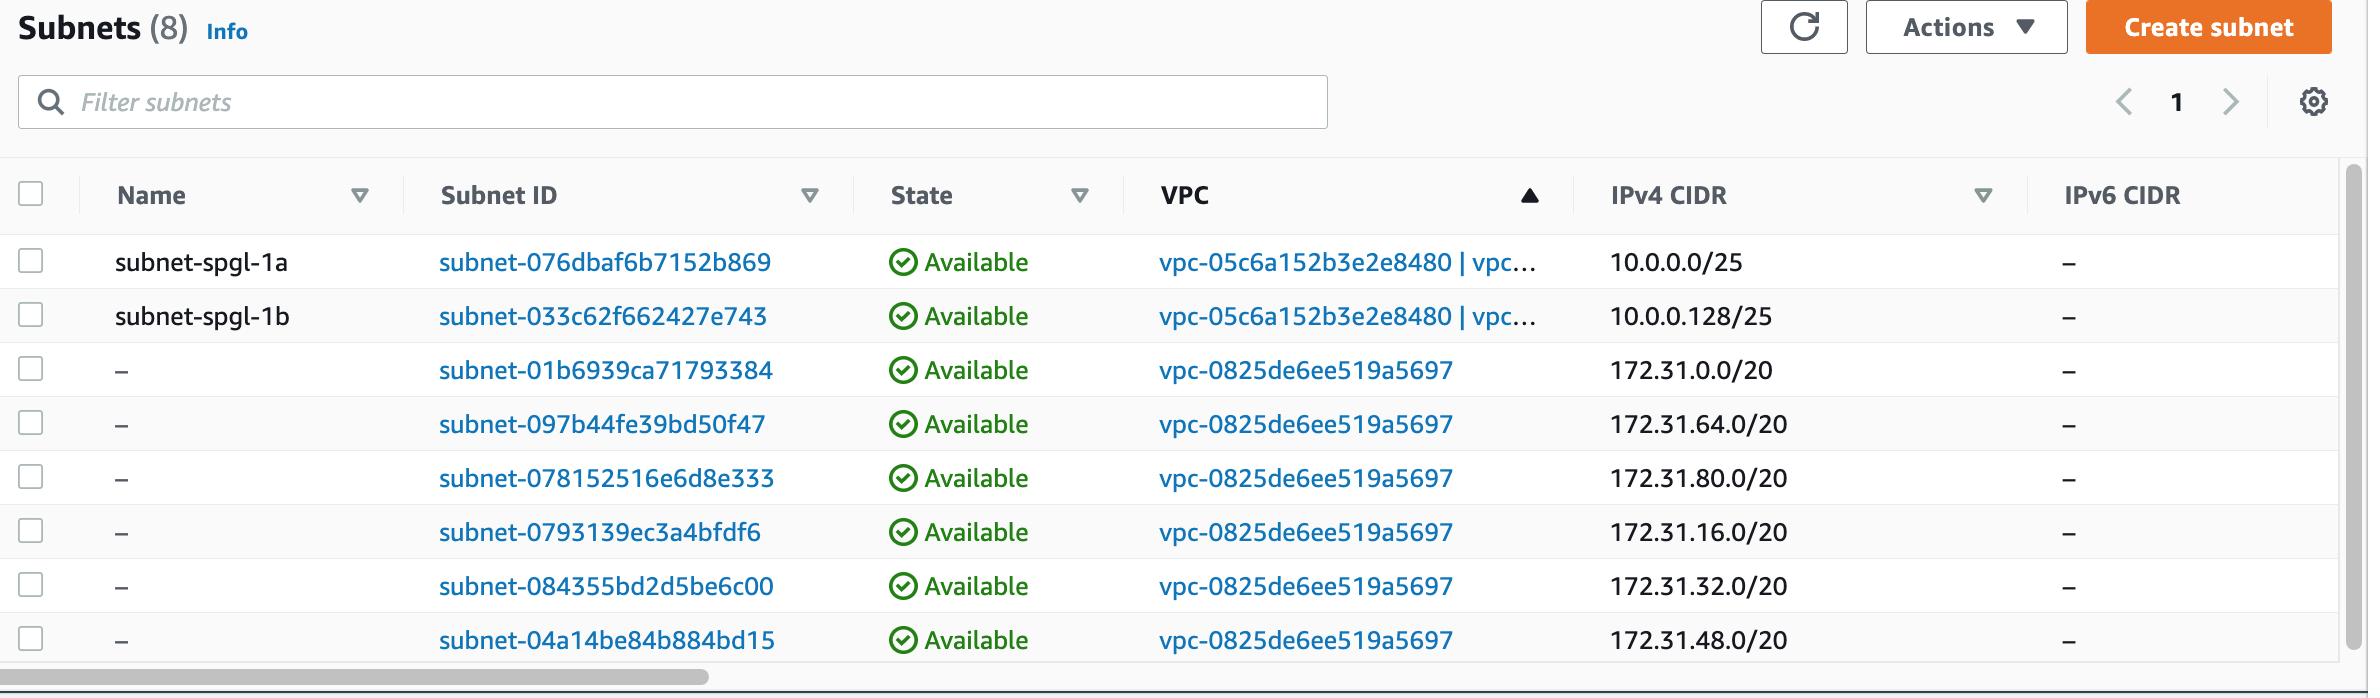
Step 5: Create a private and public Subnet.
Next, create two subnets in different availability zones. Name them so that its easier to identify which zones they belong to. Edit your NACL list so that the NACLs are associated with the correct subnet.
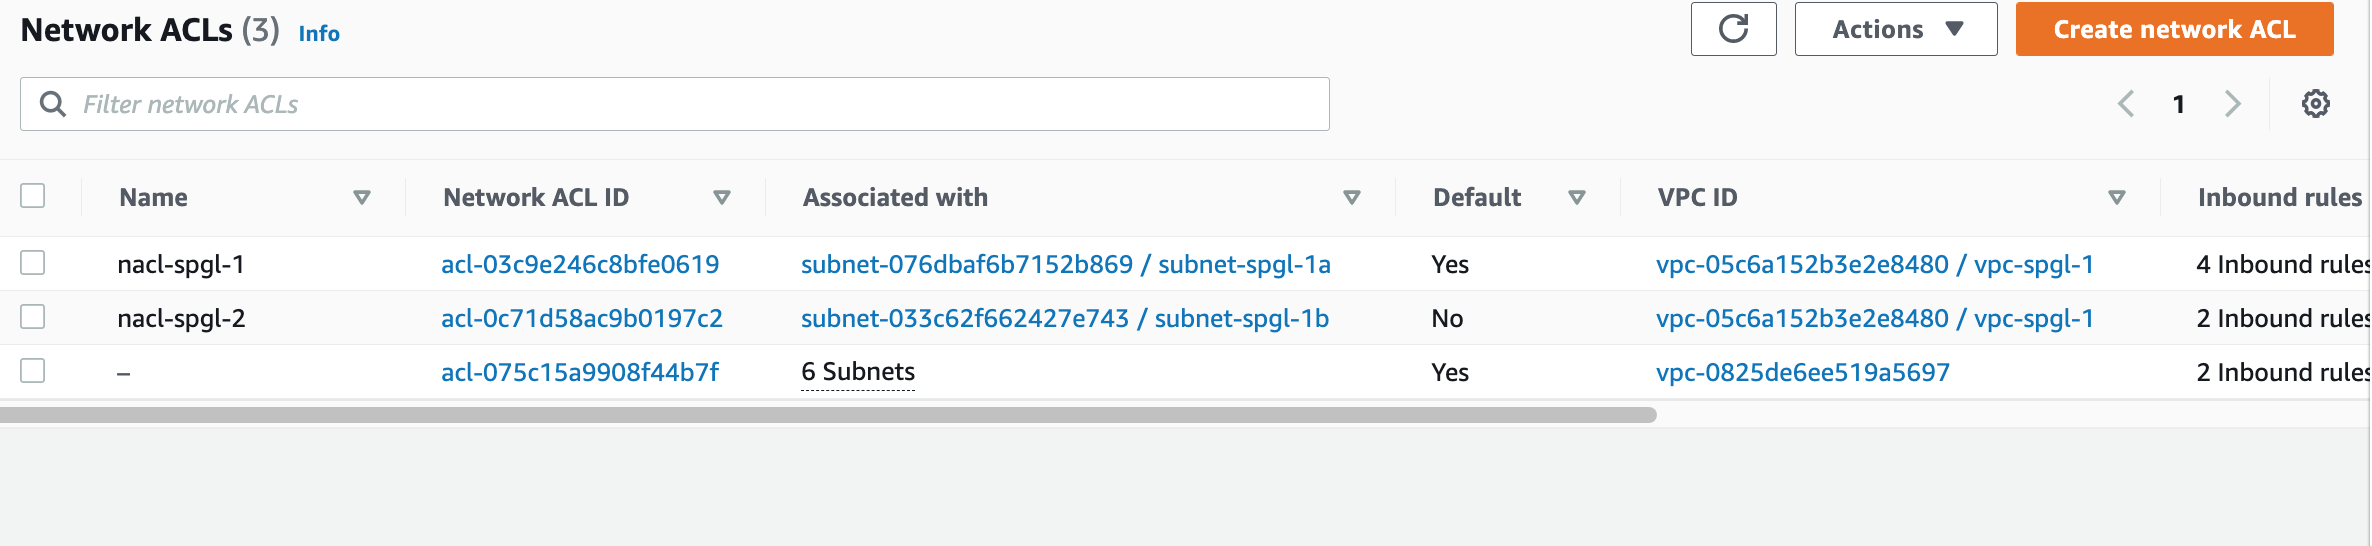
Associate your subnets with the right NACL
Step 6: Allow web and SSH traffic in your public security group.
Now, add a new security group to permit SSH and web traffic through to all servers that we'll add to the public subnet. Remember, security groups are firewalls that are applied to EC2 instances. They are different from NACLs, which are applied to the entire subnet.
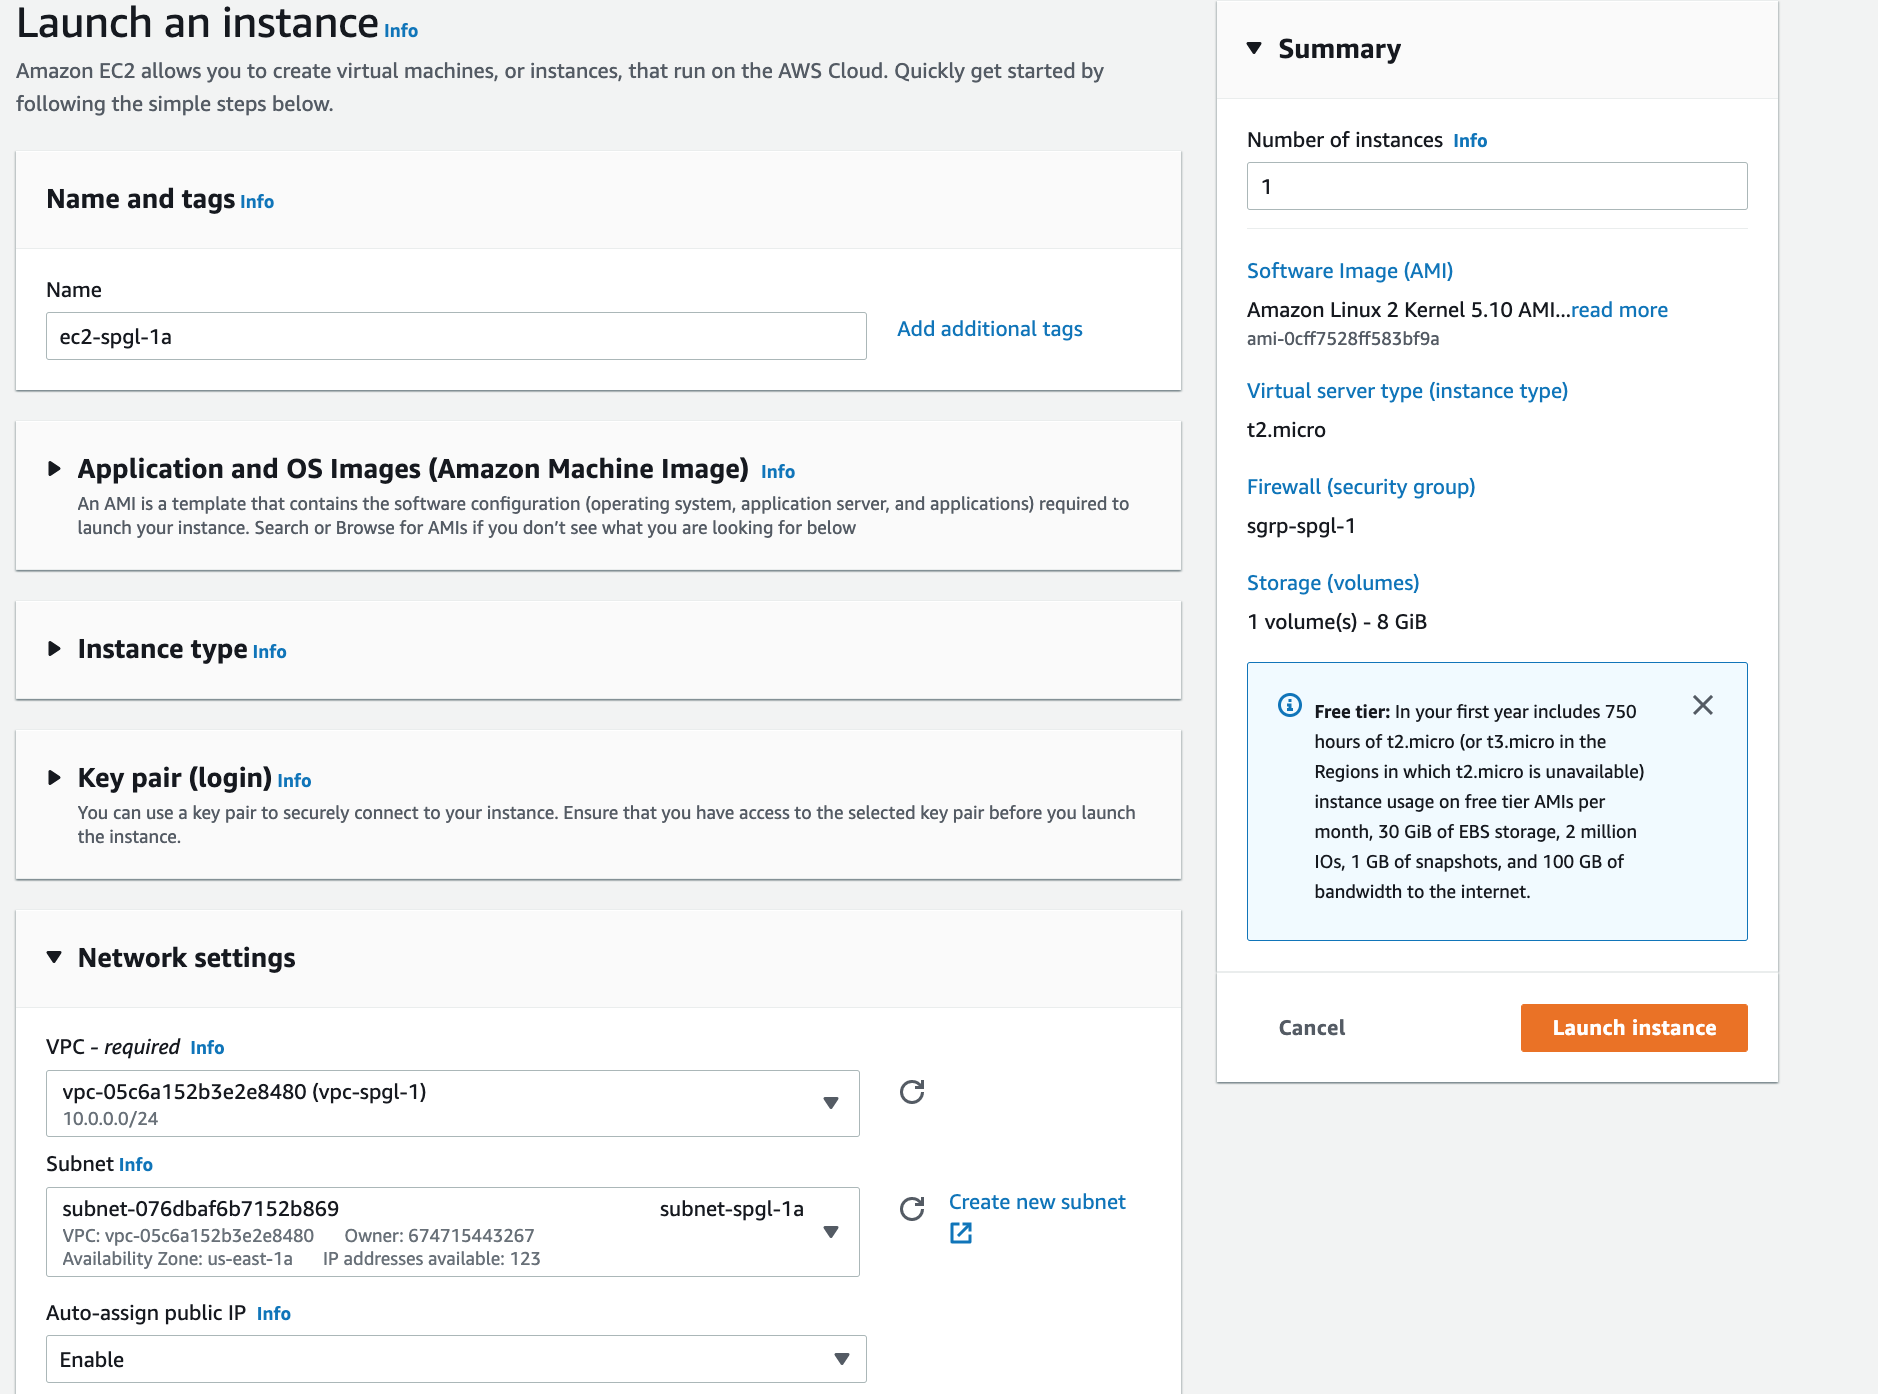
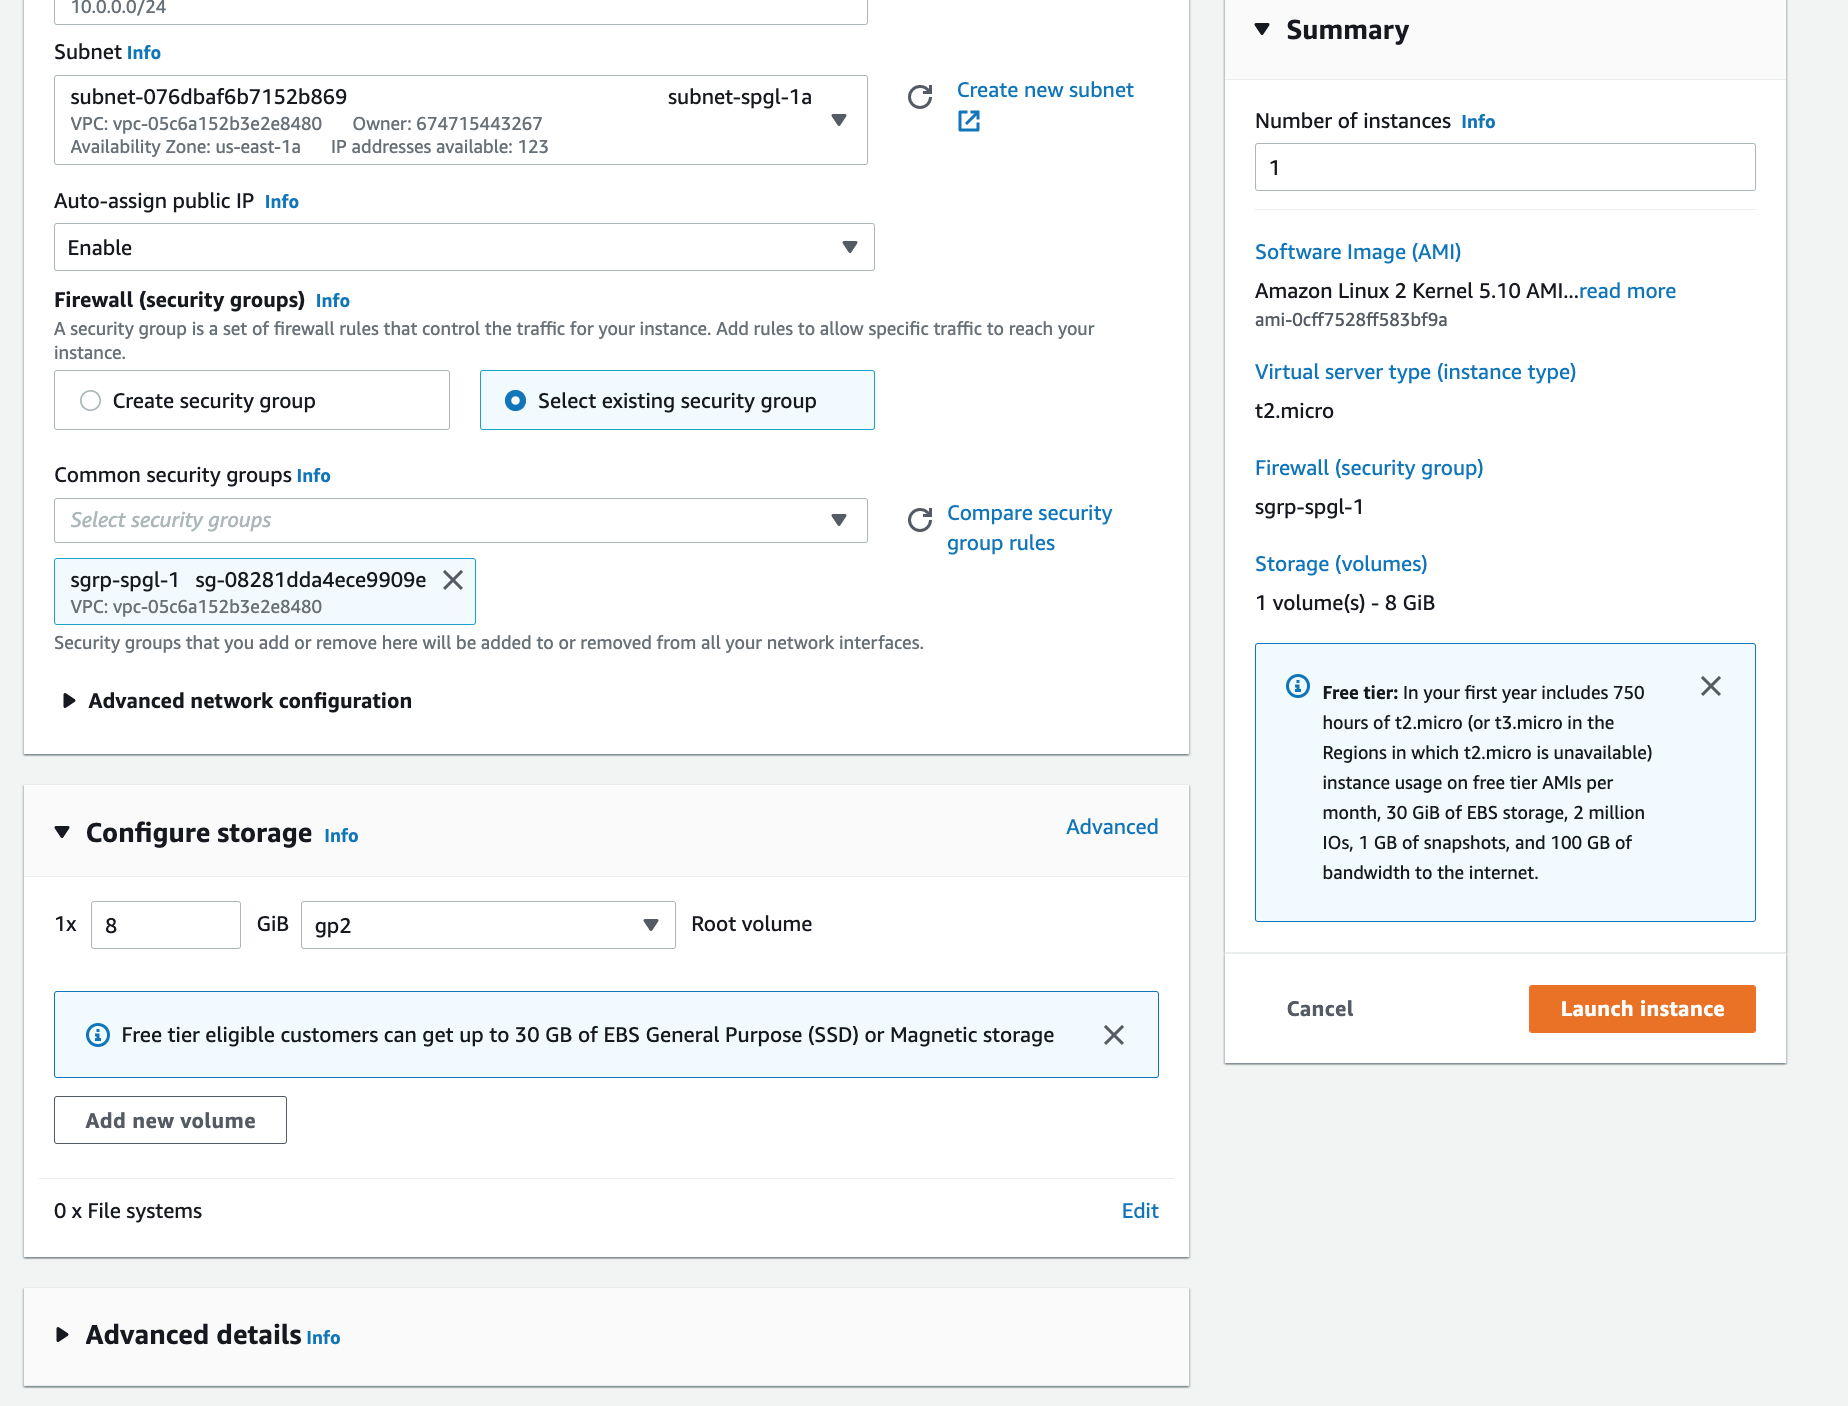
Step 7: Launch an EC2 instance in your public subnet.
And finally, launch an EC2 instance in your public subnet that can accept web traffic. More importantly, to ensure that your private subnet is truly private, launch another instance in the closed subnet. No internet traffic should get through.
Launching a VPC with Terraform
Now that you understand how a network is assembled step-by-step via the console, let's take it up a notch and launch the same network using Terraform.
First, our VPC
# Create a new VPC with `default` tenency.
# Choose an IpV4 range of `10.0.0.0/24` which
# gives us 253 usable IPs

resource "aws_vpc" "vpc_spgl" {
  cidr_block       = "10.0.0.0/24"
  instance_tenancy = "default"

  tags = {
    Name        = "vpc-${var.project_name}-1"
    environment = var.tag_environment
  }
}

output "show_vpc" {
  value = aws_vpc.vpc_spgl.arn
}
Next, the Internet Gateway
Unlike the console, we directly attach the gateway to the VPC.
# internet_gateway
resource "aws_internet_gateway" "ig_spgl" {
  vpc_id = aws_vpc.vpc_spgl.id

  tags = {
    Name        = "ig-${var.project_name}-1"
    environment = var.tag_environment
  }
}

output "show_internet_gateway_id" {
  value = aws_internet_gateway.ig_spgl.id
}
Routes in our route-table
First, we identify the default route table in our new VPC. Then, we add a route to connect our gateway to bring in internet traffic.
# Route Table

resource "aws_default_route_table" "rt_spgl" {
  default_route_table_id = aws_vpc.vpc_spgl.default_route_table_id

  tags = {
    Name        = "rt-${var.project_name}-1"
    environment = var.tag_environment
  }
}

# Add a route to the route_table permitting internet traffic from the gateway.
resource "aws_route" "route_ig_rt" {
  route_table_id         = aws_default_route_table.rt_spgl.id
  destination_cidr_block = "0.0.0.0/0"
  gateway_id             = aws_internet_gateway.ig_spgl.id
}
A public and private NACL to protect our subnets
egress and ingress resources represents rules for outbound and inbound traffic.
# Network ACLs
# Create two NACLs for each subnet of your VPC.
# One NACL allows web and SSH traffic.
# The second NACL allows only SSH traffic, keeping it somewhat private.

# Nacl 1
resource "aws_network_acl" "nacl_public" {
  vpc_id = aws_vpc.vpc_spgl.id

  # Specify your outbound rules here
  egress {
    protocol   = "-1"
    rule_no    = 100
    action     = "allow"
    cidr_block = "0.0.0.0/0"
    from_port  = 0
    to_port    = 0
  }

  # Specify your inbound rules here

  # Allow HTTP traffic
  ingress {
    protocol   = "tcp"
    rule_no    = 100
    action     = "allow"
    cidr_block = "0.0.0.0/0"
    from_port  = 80
    to_port    = 80
  }

  # Allow HTTPS traffic
  ingress {
    protocol   = "tcp"
    rule_no    = 200
    action     = "allow"
    cidr_block = "0.0.0.0/0"
    from_port  = 443
    to_port    = 443
  }

  # Allow SSH traffic from your IP.
  ingress {
    protocol   = "tcp"
    rule_no    = 300
    action     = "allow"
    cidr_block = var.ssh_source_ip
    from_port  = 22
    to_port    = 22
  }

  tags = {
    Name        = "nacl-${var.project_name}-public"
    environment = var.tag_environment
  }
}

output "show_nacl_public" {
  value = aws_vpc.vpc_spgl.arn
}

# Nacl 2
resource "aws_network_acl" "nacl_private" {
  vpc_id = aws_vpc.vpc_spgl.id

  ingress {
    protocol   = "tcp"
    rule_no    = 100
    action     = "allow"
    cidr_block = var.ssh_source_ip
    from_port  = 22
    to_port    = 22
  }

  tags = {
    Name        = "nacl-${var.project_name}-private"
    environment = var.tag_environment
  }
}
Subnets in different availability zones
First, create two subnets and associate them with the appropriate NACL.
# Subnets
# Create 2 subnets and associate them with the right NACL.

resource "aws_subnet" "subnet_public" {
  vpc_id            = aws_vpc.vpc_spgl.id
  cidr_block        = "10.0.0.0/25"
  availability_zone = "us-east-1a"

  tags = {
    Name        = "subnet-${var.project_name}-public"
    environment = var.tag_environment
  }
}

resource "aws_subnet" "subnet_private" {
  vpc_id            = aws_vpc.vpc_spgl.id
  cidr_block        = "10.0.0.128/25"
  availability_zone = "us-east-1b"

  tags = {
    Name        = "subnet-${var.project_name}-private"
    environment = var.tag_environment
  }
}

resource "aws_network_acl_association" "nacl_public_1" {
  network_acl_id = aws_network_acl.nacl_public.id
  subnet_id      = aws_subnet.subnet_public.id
}

resource "aws_network_acl_association" "nacl_private_1" {
  network_acl_id = aws_network_acl.nacl_private.id
  subnet_id      = aws_subnet.subnet_private.id
}
Launch EC2 instances in your subnet.
Launch an instance in your public subnet. To SSH into your instance, before you launch an instance, generate an SSH keypair using the ssh-keygen command on a NIX terminal, or PUTTY on windows. Paste the contents of the public key into the Terraform variable file or tfvars file like I've done in the code. Refer to the full code library on my github repo.
#  EC2 instance

# Specify the KeyPair you will use to SSH into the instance.
resource "aws_key_pair" "ec2_key_pair" {
  key_name   = var.ec2_key_name
  public_key = var.ec2_public_key
}


resource "aws_instance" "ec2_public" {
  ami               = var.ec2_ami_id
  instance_type     = "t3.micro"
  key_name          = aws_key_pair.ec2_key_pair.key_name
  availability_zone = "us-east-1a"
  # When spinning an ec2 VM in a VPC, use vpc_security_group_ids instead.
  vpc_security_group_ids      = [aws_security_group.sg_public.id]
  subnet_id                   = aws_subnet.subnet_public.id
  associate_public_ip_address = true

  tags = {
    Name        = "ec2-${var.project_name}-public"
    environment = var.tag_environment
  }
}

# Print the Public IP of the EC2 instance
# to the terminal.
output "ec2_public_ip" {
  value = aws_instance.ec2_public.public_ip
}
At this point, you should be able to SSH into your instance with the keypair you attached like this
ssh -i <your SSH private Key> ec2-user@ec2-ip
That's it. Your you now have a VPC to host a web-service or an internal application. You can slice and section your network in many ways, so don't hesitate to customize this set up for your needs.
As always if you have any questions, For questions or suggestions, please DM me @sandeep_gopal