How to Cloud - Deploy a static website to AWS S3.
May 3, 2022
What is a Static site
In a static website the HTML content of web pages does not change. Unlike dynamic sites, where a server language creates your HTML pages on the fly, a static site only serves HTML pages. You can serve a static site from a computer, a Rasberry pi, or web-host of your choice. A cloud provider like AWS makes it easy and affordable (almost free) to host a static site. You store your site on a cloud storage service like S3 and point your DNS to the content and you're done.
Benefits of a Static site
A dynamic site uses a server-side languages like PHP, NodeJs or ASP.Net to generate HTML pages from a set of templates. An e-commerce store might have a handful of product-template pages. For each product, the server side language reads a database and fills the template with the product details like price, reviews and images. These operations take time, and while they are fast, there is a cost associated with generating pages on the fly. As the name suggests, Static sites contain just HTML pages. These pages can be pre-made with frameworks like Gatsby and Middleman. But when you deploy the site to a server, all you send down the wire are static HTML pages. Therefore static sites load faster. Static sites are cheaper to host. Since there is no database to hack or server to compromise, static sites, in principle, are safer than their dynamic counterparts.
What are the downsides to a Static site?
You are constrained by what you can do with a site. While there's always a technical solution to deploying a complex e-commerce site or a media site statically, such websites are better served by a dynamic website. Also, sites that require users to be validated, serving different pages to different users, interactive forms, etc can't be done well with a static site. You can't host a Facebook or Twitter statically.
How do we deploy a static site to S3?
These are the main steps you'll need to complete
- Create an S3 bucket and enable website hosting on the bucket.
- Set up the permissions on the bucket so that it's contents are publicly available.
- At a minimum, create an Index document, that will act as your
index.htmlpage. Or you can copy over your code to the bucket. - Create a DNS record that will point your registered domain (like www.myblog.com) to the content in your S3 bucket.
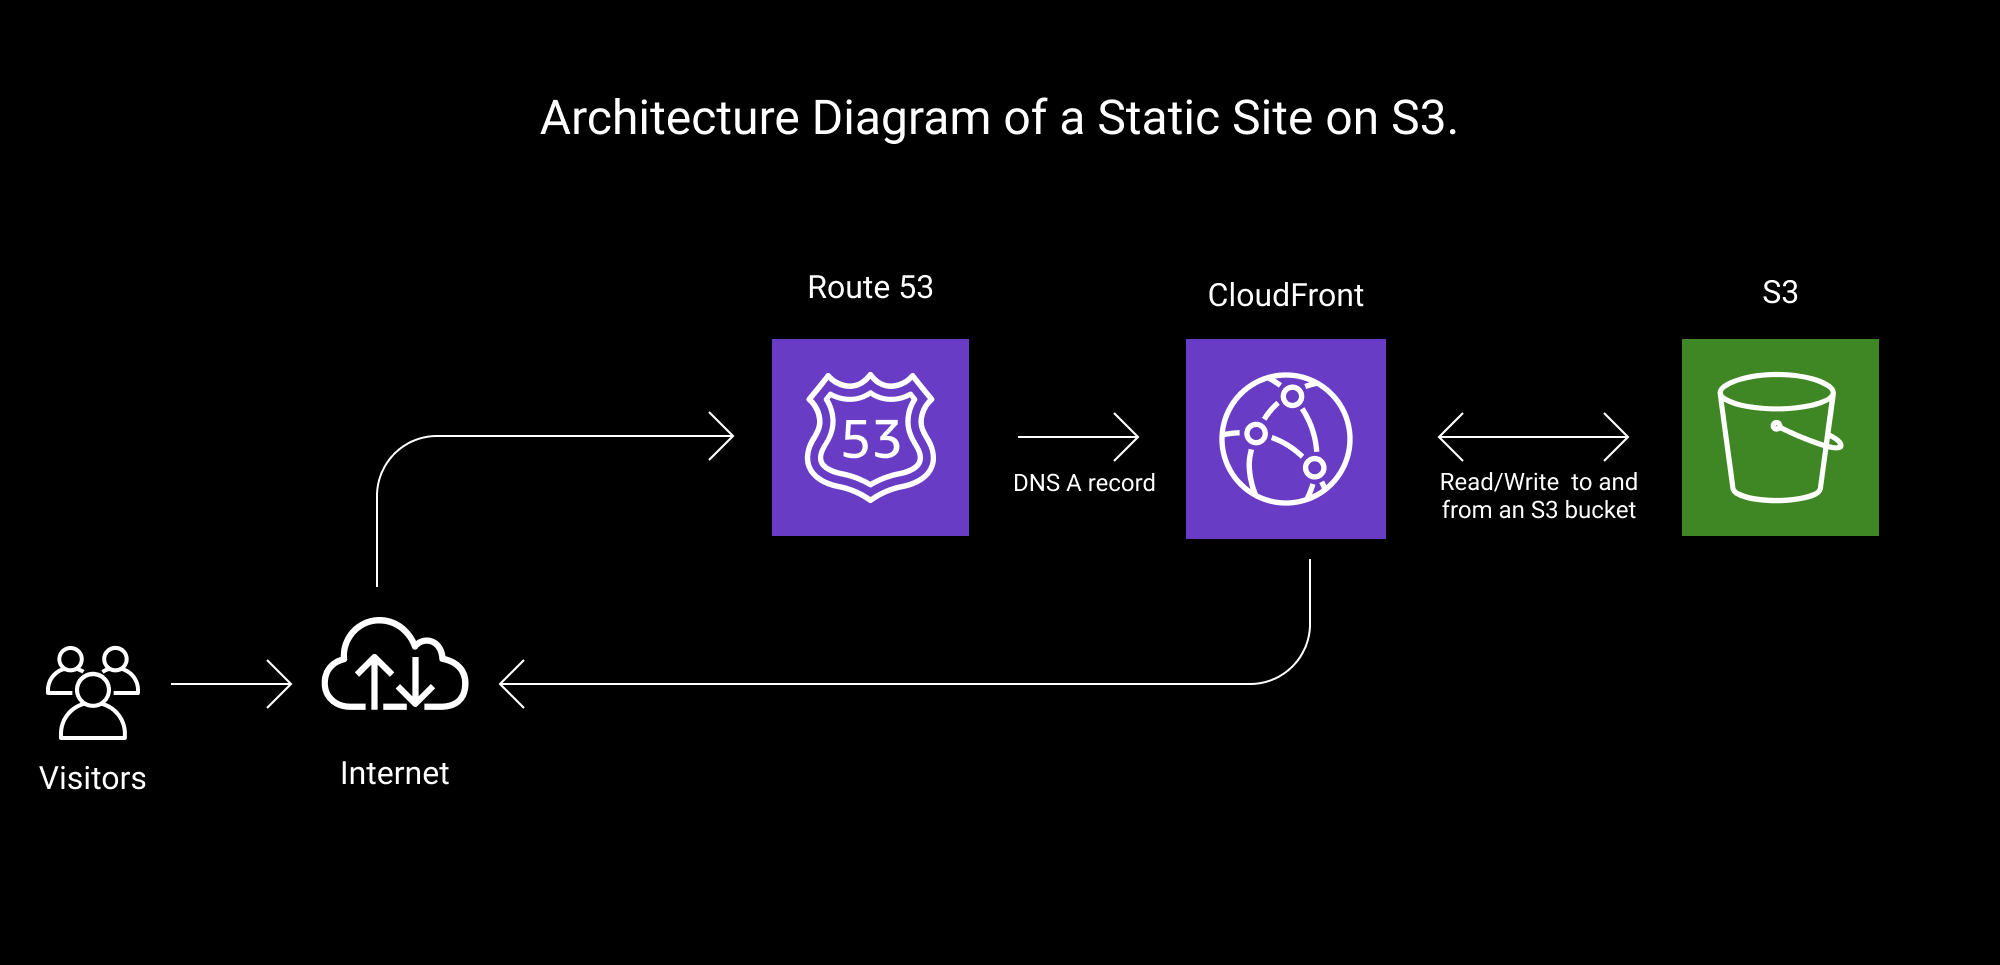
Here's an architecture diagram of my setup.
You can wire these steps manually from the AWS console. Since this is a cloud-centric blog with a focus on best practices, we'll use Terraform to create the cloud resources, deploy our site and generate the correct DNS records.
We'll do our best to adhere to AWS's Well Architected Framework. Why bother you ask? A static site is not much, and you're right. But your startup or company will rarely have just one software property. A static site will be part of a larger system, and you want the whole system to be instantly deployable, scalable and performant. So here goes
Code
The entire code is available here: Link. I'll explain the components below
Assumptions
- Your domain is already registered with Route53 (AWS's DNS service) and has an associated hosted zone. Terraform's AWS API cannot register or delete a domain; when you declare the domain, Terraform brings the domain under it's management.
- You have a verified public-certificate issued by ACM (AWS's certifcate manager) for your domain. Instructions here. We'll need the certificate to secure your site with HTTPS. ( Note: You can skip the certificate if all you need is a site served via http.)
- Your certificate is verified (either via DNS or email). An unverified certificate cannot be used on a Cloudfront distribution.
Step 1: Register a Domain with Route 53
Route53 is AWS's DNS service (think Godaddy). This is a multi-step process requiring your personal information as well as a payment method. This step isn't instantaneous, it can take minutes to an hour or more to see your domain on Route53. I transferred an old domain I owned, planetspecs.com, from an old project that was no longer in use.
Remember to : create a new Hosted Zone with the same name as the domain name. Later on, we'll sync the Name Servers on the Hosted Zone and your domain.
Step 2: Request a Certificate with ACM.
Request a public certificate from ACM (AWS's certficate manager) to be used with Cloudfront to serve the site with HTTPS. Validate the certificate using DNS records on Route53. The status on the certificate should be issued to be able to use it later.
Note: from here on, all infrastructure will be set up with Terraform. Although ACM has several Terraform modules, validating the domain is a manual step and is best performed once, at the start.
Step 3: Set up S3 to host a website
Create an S3 bucket with Terraform. Your bucket name should match the domain of the static site. Then, convert the bucket to host a static site with the aws_s3_bucket_website_configuration resource.
resource "aws_s3_bucket" "my_static_bucket" {
  bucket = {{Your domain}} # Example - mystaticsite.com
  tags   = {
    Project     = "spgl_static"
    environment = "test"
  }
}

resource "aws_s3_bucket_website_configuration" "my_static_website_config" {
  bucket = aws_s3_bucket.my_static_bucket.bucket

  index_document { // optional
    suffix = "index.html"
  }

  error_document { // optional
    key = "error.html"
  }
}
Step 4: Permit public access to the bucket
No point hosting a site if no one can read it's contents, right? Assign your bucket an ACL (Access Control List) to permit read-access to your site's content. Then, attach a custom policy to your bucket that allows visitors to you site read-access to it's contents. Policies allow fine-grained control over the contents of the bucket.
resource "aws_s3_bucket_acl" "my_static_bucket_acl" {
  bucket = aws_s3_bucket.my_static_bucket.id
  acl    = "public-read"
}

resource "aws_s3_bucket_policy" "allow_public_read_access" {
  bucket = aws_s3_bucket.my_static_bucket.id
  policy = data.aws_iam_policy_document.allow_public_read_access.json
}

data "aws_iam_policy_document" "allow_public_read_access" {
  statement {
    principals {
      type        = "*"
      identifiers = ["*"]
    }

    actions = [
      "s3:GetObject",
      "s3:GetObjectVersion",
    ]

    resources = [
      aws_s3_bucket.my_static_bucket.arn,
      "${aws_s3_bucket.my_static_bucket.arn}/*",
    ]
  }
}
Step 5: Copy your site content to the bucket
Your bucket is ready to host your website; now it's time to copy over your content. Your content should be a mix of html, css and js files in a predefined directory structure. Use the aws_s3_object resource to copy over the entire block of code to your site.
# Write the index page to your bucket.
# Note - this is for testing purposes only.
resource "aws_s3_object" "object" {
  bucket       = aws_s3_bucket.my_static_bucket.bucket
  key          = "index.html"
  source       = "../index.html"
  content_type = "text/html"
}

# Write the index page to your bucket.
resource "aws_s3_object" "object2" {
  bucket       = aws_s3_bucket.my_static_bucket.bucket
  key          = "error.html"
  source       = "../error.html"
  content_type = "text/html"
}
Step 6: Spin up a Cloudfront Distribution to serve your site with HTTPS
Cloudfront is AWS's CDN, or content delivery network and you'll need one if you want your site to be encrypted with SSL (https). If your site is for private use only, or you intentionally want no SSL, then you don't need this step. Simply create an A record in route53 for your domain that points to an S3 alias and you're good to go. In 2022, all modern sites need SSL and this step is recommended. Technically Cloudfront has a cost, but AWS's free tier is generous enough for a lot of sites.
locals {
  s3_origin_id = var.domain_origin
}

# Read the ACM certificte  for your site cert
data "aws_acm_certificate" "site_cert" {
  domain   = var.domain_name
  statuses = ["ISSUED"]
}

# Create a cloudfront distribution for your S3-hosted static website

resource "aws_cloudfront_distribution" "s3_static_distribution" {
  origin {
    domain_name = aws_s3_bucket.my_static_bucket.bucket_regional_domain_name
    origin_id   = local.s3_origin_id
  }

  enabled             = true
  default_root_object = "index.html"

  # log requests to the distribution to the logging bucket you created.
  logging_config {
    include_cookies = false
    bucket          = aws_s3_bucket.my_logging_bucket.bucket_domain_name
    prefix          = "log_cf_static"
  }

  # An alias to your domain.
  aliases = [var.domain_name]

  default_cache_behavior {
    allowed_methods  = ["GET", "HEAD"]
    cached_methods   = ["GET", "HEAD"]
    target_origin_id = local.s3_origin_id

    forwarded_values {
      query_string = false

      cookies {
        forward = "none"
      }
    }

    # How to serve your site (http / https / or redirect all to https)

    viewer_protocol_policy = "redirect-to-https"
    min_ttl                = 0
    default_ttl            = 3600
    max_ttl                = 86400
  }

  tags = var.tags

  # An ACM SSL certificate to encrypt the contents of your site.

  viewer_certificate {
    acm_certificate_arn = data.aws_acm_certificate.site_cert.arn
    ssl_support_method  = "sni-only"
  }

  restrictions {
    geo_restriction {
      restriction_type = "none"
    }
  }

  custom_error_response {
    error_code         = "500"
    response_code      = "200"
    response_page_path = "/error.html"
  }
}
Once the Terraform scripts have run, your site should be available and point to the content on the S3 bucket. Here's a link to the AWS reference document with more information on the topic.
As always if you have any questions, For questions or suggestions, please DM me @sandeep_gopal